Wednesday, June 20, 2012

Playing with a D800 file.

In my quest to keep learning, I follow guys like Jared Polin, who has this Fro Knows Photo site, and does lots of photo video tutorials. One of the things he does is Fro's edit of the week, where you download a file, edit it, and upload it. This week, there was a D800 file, which I was interested to see and play with, so I gave it a go.


The file is huge - abt 32MB, or about 3 times bigger than the normal D90 files.

The Original RAW looks like this.


Here's a Cropped Version: Check out how much detail there is.

Add a little Lightroom: The image below is what I uploaded, using a preset I just found online.

Here's a Further Crop: Seeing how much crop this image can take, I cropped it more. The detail/clarity is insane!


Add a touch of Lightroom: I can see myself getting used to such big files. And the dynamic range should be quite nice too.


I'm going to see how the D600 turns out (should be out later this year), but I can see myself liking the D800 very much!


Keep Shooting!

Tuesday, June 12, 2012

How I Shot This (1)


I was at ARPC church camp @ Hotel Palace of Golden Horses, KL last week. And I walked around a bit, seeing what would be interesting to shoot. I saw the sun setting-ish, and thought it would make an interesting shot, so I shot the scene using my D90 + Tokina 11-16, setting it at 11mm, switched to manual shooting mode with aperture at F8; shutter speed 1/1250 (based on the sky exposure); ISO200 at RAW. I shot 6 shots actually, but only the middle 3 were used, see below.

Just note that this is w/o ANY processing, no in-camera or Lightroom processing, so it looks pretty dull. With Lightroom, I import all my pictures now using the adobe provided "Direct Positive +" preset. Due to the uneven light, I pulled my "highlights" slider to -100; "shadows" to +100; boosted the "clarity" and "contrasts" a little, and this gave me


So it's starting to look a bit better. Now, behind me, there's a "lake" so I couldn't move back. And I wanted all the palm trees in the picture, with a bit of space on the left - which is why I decided to shoot a few (6 in all). When I tried to stitch all 6, it was really warped/distorted, so I experimented with 1 less picture, until I thought the 3 looked best.

I use Microsoft's Image Composite Editor, which is the best free stitching program I've tried, and it gave me this. This is probably what the eye "naturally" sees.


But I wanted to give the clouds a bit more of a dramatic edge, so importing it back into Lightroom, I again pulled the highlights to -100 (to soften the brightness of the sun), shadows to +100 (bring out details in the shadows, else it is too dark); boosted the contrasts and clarity again (just gives more definition to the clouds, but the downside is that the trees look "artificial" with a bit of ugly halo, but it's a bit of a compromise) -it won't be everyone's taste, but I prefer it. There's this HDR quality which I'm not all that fond off on the trees, but I loved the effect on the clouds.

The end product is the picture right in the top!
This is for Bryan Kam, one of my photo mentors who helped me tremendously when I just started out, 1.5 years back, who was curious how I got the shot. So it's a step-by-step tutorial.

I just have to say Lightroom is a really great tool, and can't recommend it enough. It is easy to use, and very powerful (I'm only using the tip of the software's ability, and still lots to learn - thus my post processing isn't all that good, but I'm experimenting and learning).

Keep shooting and learning new stuff to try!

Saturday, June 2, 2012

How to shoot Panorama - with what you have!

There are times when just a single picture, cannot capture a scene, the breathtaking snippet of the wonderful creation of God. Other times, you just want to take a panorama (long, wide angle) shot, just for the hack of it, like me in the picture above.

You don't really need any fancy equipment. The above shot was taken with my D90 DSLR, with a Tokina 11-16mm lens - handheld. It could have easily been any decent point and shoot or even iphone. For the above, I shot at 16mm, shot with approx 1/3 overlap. Then I use Microsoft Image Composite Editor (best Free photo stitch software I tried), select which pictures (there were 8), and it automatically joins it all together.


Here's another example with just 4 pictures stitched together.


The above is a little more complicated. The first time I did, it didn't turn out so good. So I went back, mounted the camera on a tripod, swiveled it and methodically shot it. 19 pictures altogether. But because the panorama is so wide, any unevenness ends up distorted (the ground wasn't 100% flat, and the horizon wasn't 100% level. I tried the same shot, at 24mm instead of 16mm for the rest, and the distortion was significantly less. But too narrow.


Here's a 16 image pano. Not as much horizontal distortion. But due to physics, the parts closer to you (in the middle), end up more distorted/very close together, sides stretched out. And I should have shot a bit more to the right, and have the whole tree in.

I managed to take about 20 different panoramas, and processed all of them, and here's what I learnt:

1.Timing: sunrise or sunset. Those are the best times to shoot, the light is just gorgeous, not too harsh.You get a nice warm glow.

2.Camera settings: Manual mode completely. No auto mode, so that the exposure is exactly the same, or you'll end up with pictures that are patchy and inconsistent. Else, you end up with different exposures, and patchy pictures after you stitch. Oh, shoot Raw. There's just so much more data available to use later in post production.

3.Expose for the bright areas. The exposure is tricky, in such a wide panorama, do you expose for the sun/brighter areas or darker areas? I chose the brightest area, so that you don't have blown highlights (check also histogram)- you can always bring out details out from dark areas, but once it is lost/blown out, there is no data there to bring out. So I used F16 (bigger number is good, means small aperture and everything is clear), 1/30s shutter speed (what the camera says is right exposure) ISO 100 (lower better, for low noise), manual white balance (I used sunny), and manual focus (use auto to get the right focus, then move it to manual).

4.Tripod is necessary for very wide panos. Optional for those with fewer pictures. For really wide panoramas, you need the tripod (so that you don't have gaps). Or you can try experimenting hand-held. But on a tripod, I make sure that I can capture what I want, from the start to the end.

5.Overlap by at least 1/3. I take the first shot, if it looks ok (exposure, composition), I shot a shot every 15 degrees. You need at least 1/3 overlap between pictures- more better. As per my comments in the 4th picture, I think if you have more pictures, with more overlap especially in the middle/closest to you - you will have less distortion, and a more natural pano.

6.Shoot portrait. Unfortunately, all my shots were shot landscape. And you get gaps, esp at the corners - like my 3rd picture above, the trees got cut off, as it just wasn't tall enough. What I should have done is, shoot portrait, give lots of room around what you want to shoot, then you can crop in later. If you have gaps, then you're stuffed, and the effort is wasted. You'll end up with more pictures, but again, better more/excess than less/shortage.

7.Use a normal lens, not Ultra Wide Angle lens. The UWA (tokina 11-16 f2.8) is a great lens, very sharp. But for panoramas, the distortion is in proportion with the number of pictures to be stitched together. See above pictures, the 4 image has the least image distortion. 8 image has more, and the 19 has just too much. So if you have just a kit lens, that should be fine. You need a small aperture anyway (big F number).

8.Post Production: Check exposure. I use Lightroom, and I look at the brightest picture, and fine tune it. Then I copy the settings to all other pictures to be used in the same pano. For a few, when the light shift too much, I had to manually tweak the light levels (only), so that it looks even across.

9.Post Production: MICE to stitch. Easy, fuss free, and fast. I import into Lightroom again, for a final touch up, but it really isn't necessary.

Voila! A Pano to capture the scene you want.
Keep Shooting!


Monday, May 28, 2012

How to use ND Filters?


I love long exposures, the streak of lights from cars, the star burst from a street side lamp.
It helps you "see" in the dark, a city comes alive after dark - but that's all in the night.

You can also shoot long exposures during the day, giving you a complete different look and feel.
Those waterfalls that have smooth curtain of water? Yes, they use a ND filter, to filter out light so that your shutter speed can stay open longer.

I got a 9 stop ND filter from Hoya (it filters out 2 to the power of 9 times of light, leaving 1/512 % of light coming through), which costs me about S$50. (there are also variable ND filters, that go from 3 stops to 8 or 9; and also 10 stop filters from B+W, but is expensive). Here's how it works.


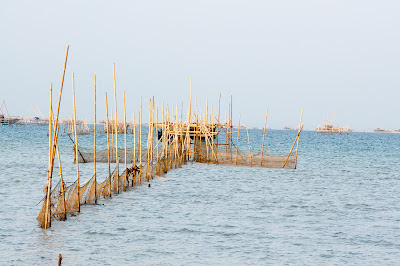
On the left, this is a "normal" shot of some kelongs (fishing huts) which I saw at my recent holiday. Camera on tripod, shot at F16; 1/60sec; ISO360 at 170mm.


Here's the same shot, with a 9 stop ND filter attached. F16; 30seconds, ISO200. You see that with the longer exposure time, you can see all the waves movement are "smoothened" out.


The picture right on top, is after I've processed it in Lightroom, including a B&W conversion - which I think looks better than the 1st. It works better if the background isn't cluttered, like in my case. You get a better minimalist/surreal kind of picture.

Here are a few more examples of pictures made with ND filter. Note that the ND filter does have a blue color cast, which can be easily corrected in Lightroom, as long as you are shooting RAW.

And one more, of a slightly different use. This is the underground link from The Fullerton to One Marina Boulevard in Singapore. There's a travellator there. I mounted my camera on tripod, put on the ND filter, stepped onto the travellator and shot this at F5.6; 30sec; ISO400. You get this interesting zoom effect, whilst the ground is still clear (as it is moving with you). Added a yellow color cast in post processing, just to make it look more out-of-this world/interesting (to me!).


So, here's a new tool, that isn't too expensive, but fun to learn and try! Keep shooting!

Sunday, May 20, 2012

Bored? Try Light Painting

After reading an article in Digital Camera Magazine (Malaysia Mar12 Edition I think), I decided to give Light Painting a try. I went to hardware store to buy a colored LED light, which ended up way too bright - so I used a normal laser pointer (the one used for presentations).

1.Here's what needed:
a.Tripod
b.Camera (d'uh)
c.Remote Trigger (or set camera on timer)
d.Laser Pointer
e.Really dark room (ideally with black out curtains)
f.Object to "paint"

2.There's a bit of trial and error, but here's what I did
a.ISO to Native ISO (in my case 200. Could be 100 as well, I guess).
b.Aperture to F16
c.Shutter speed set to bulb mode
d.Press the trigger
e.Use laser pointer to draw outline of the object - or what ever effect you want.
f.Press the trigger to end the exposure (in my case was 53 seconds).


Here's the best of a few tries. It's a pair of my son's football boots, put on my marble floor (hence the reflection). Well, it was fun trying something new, so I'm happy to share.

Have fun shooting!

Monday, April 16, 2012

I've been legally Lightroomed!

A friend "passed" me his copy of Lightroom 2, when he got his Lightroom 3, fairly recently, which I've used a lot, and learned to love it! I've mentioned it previously, but this is a longer post.

Here's why I love Lightroom:
1. I have my entire library of photos organized and cataloged.
a.All my pictures are filed according to Country/City/Year/Dates.

b.Most of my pictures have been tagged with keywords, can't say it has been diligently done 100%, but in theory, I could find a picture via keywords, like google search.

c.You can also tag it 3 different ways - color code, # of stars, but I use the simplest, which is to flag it. See more on workflow below.

2.Makes using RAW files a breeze.
a. The problem I had previously with other free RAW processors, is that the JPEGs were always nicer, and better processed. But with Lightroom, processing is decidedly superior, easy to use, and almost anything you need to do, can be done with it - all in 1 software. No more having to switch to different free photo apps to do different things. Lightroom makes handling of files, so easy, except you can't add borders, and do major tweaking (adding or removing elements to the photos), which I don't.

a.With Lighroom, using RAW files, is as easy as JPEG, and still retains all the info (you lose bits when you shoot JPEG). Think Film versus Printed Picture. And you don't need to bother with White Balance - just put on Auto, and you can always tweak it if necessary. I've set LR to automatically convert the Nikon RAW files (NEF) to Adobe's Digital Negative format (DNG), so u just pulls the files, converts, and sorts it into the filing system per 1a above. The advantage of DNG is that the metadata (stuff like keywords) become part of the file, instead of LR having to create a different file for NEF.


3. Simplifies Workflow
a.So after I import in the photos, I do a quick vet, deleting the bad shots, or shots I'd never use. This removes easily... 50% of the shots or more.

b.I go through it again, flagging those I want to post online, and seeing if any of those I want to do some touch ups (whether convert to B&W, boost contrasts etc). I also add in Keywords, if I remember or can be bothered to. *I should be more disciplined..... but.....*

c.With a keyboard shortcut, I export all to a temp folder (same folder I sync my ipad photos with, so that a copy is also available there), then upload. Pretty easy.

4.Love the processing
I just love the B&W processing, boosting the colors of the picture, and I'm still learning. All of my pictures have been processed (some less, some more) through Lightroom. Here's a few examples:


Just take note that, the most important ingredient of a good picture is, composition. This is something you cannot lightroom your way out of. Lightroom is only a tool, to enhance a picture - but you still need to get the basics right, composition, aperture/shutter speed, exposure. 

Lightroom 4.
So lightroom 4 was recently launched. The advantages I see over LR 2 are
a. Controls have been simplified. It is marginally easier to use, and theoretically more powerful too! I'll find out more when I use it more.

b. Can import videos as well (LR2 couldn't, and I would accidentally delete the videos, if I forgotten to use explorer to cut and paste into where I want it.). Just saves a step, but a rather important one.

c. Photobooks - it's there. Havn't used it. But I could, if I wanted too!

d. The Price. LR2 and LR3 used to cost US$299, and Adobe has cut the price 50%.
So I finally decided that, since I love Lightroom so much, I should properly own my own copy.
Walking by so many "software" shops here in Jakarta, I confess I felt tempted to pay Rp50,000 or S$7 for a copy! But in the end, I decided to "give to Caesar what is Caesar's", found a copy online and purchased it for abt Rp1.5mn or S$210.

I'm a happy camper! And I encourage anyone, more serious about getting the best pictures out there, to get one (legally) too!

Keep Shooting :)

Tuesday, April 10, 2012

On Pixoto

I love Pixoto -it is "an online community where photographers compete to have the best images in their category."

It's a place where you can upload pictures, and within minutes/hours - get some sort of feedback from other photographers how "good" an image is. Mainly used by photographers (I think), some bad, some good, even some are pros!


This is how it works.
1.You sign up for an account

2.Upload a picture, pick which category it is in, your picture gets challenged by those within the same category, like landscape, travel, fine-art, sports etc (not sub-category, like which sports category it is in).

3.Irrespective of whether you upload or not, you get to vote on "Image Duel", where you pick which of 2 pictures you like better. Loads of other people do this (see #4 on why), and your picture quickly gets a score, to be fine tuned in the next days/weeks to come. Typically, it's pretty hard to get 600 and above. The highest score I see is maybe 750ish or so. Anything below 400, will typically fail to proceed - unless you keep paying for it to be challenged. 

Note: scoring really depends on those who are online at that moment voting. Sometimes, I get a picture stuck at 100 or 200+. I wait till next day, or a few hours later, and try to buy more challenges, it gets better. Sometimes I try a different category, and works. Often, a bad image stops no matter how many challenges you buy or resubmit.


4.How it works is, you need credits to upload (10), and if a picture fails to proceed to more duels (typically when you lose 50% of the duels) - u need five to get it to be challenged 3 more times. So people will vote to earn credits. So the system automatically pits a new picture with say an existing picture with a score of 100. If you win, they will pick a better picture of say 200, so the picture very quickly finds its place amongst its peers. You can read more on the technical bits on scoring, how they treat people abusers etc. But it's a system I think works ok, easy to easy and fun!

5.Awards! You get awards if your picture gets into top 10 of the day (of that category), if there are at least 50 pictures uploaded. Also awards for top 10% of the week, top 20% of the month etc. It's fun, encouraging and ego inflating to win awards! Yes, I've link my Awards page, just to give an idea.

What's good?
- Easy to use
- Quick feedback on how good a picture is - from other photographers. Every picture gets voted on, so theoretically a chance to get good points.
- Fun to get Awards! Great incentive to go on shooting better pictures.
- Great place to get ideas, look at why you like certain pictures (by others), and why not others, and so far fairly inspiring (for me)!

What's not so good? 
- Don't get caught up too much on this. Don't shoot to win credits or awards, they are after all decided by others. It's a fun start, and something to do that doesn't cost a cent! But don't let others dictate your own style, and don't just copy others. Eventually, you'll want to find your own niche, your own style - although I'm not there yet!

Keep shooting!