Thursday, August 27, 2015

Thoughts from First Charity Auction

Singapore Chamber of Commerce here in Jakarta, had our Singapore National Day celebration on 26 August 2015. Thrown in last minute were pictures of Singapore, they wanted, and to be auctioned off for charity!


1.Selection
I don't have a lot of Singapore pictures, since I only shoot when I go on Biz Travels, and timing wise, not always that fantastic. I struggled to find those "print" worthy.

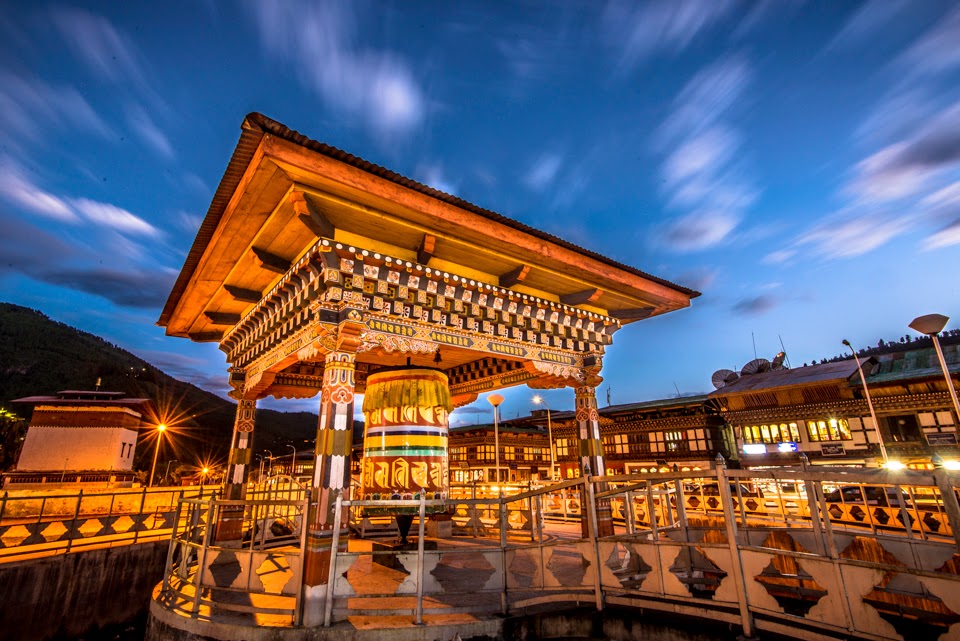
I picked the top pix, as it was obviously Singapore, and did quite well on social websites like 500px and Pixoto - which was taken fairly recently. I had to dig through some older pictures.

The last picture in this blog, was the one I thought over the most, I hated it when I took it, just didn't make it. But I didn't have enough, so decided to see what could be done.


2.Post Processing

Since I was going to print this biggish, I wanted to re-touch up the post processing of the pictures - for facebook, I don't really do much, as FB resolution is small, and often degenerate the picture anyway.

But this picture, which I previously liked, looked bad. I struggled with the post processing, the sky too grey, the sea not clear enough.
Anyways, I finally went to the printer, and got the 5 printed. I realized it's really nice to see pictures printed out. But all the flaws are also blown up.


3.Lessons from the Print - Calibrate your Monitor
 
The B&W picture were fine, but the color pictures, just seem a bit off. I was not so happy with my post-pro, and how it turned out. There IS a difference, and next time I do something similar, I will invest in a monitor calibration spyder thingee.


4.Lessons from the Auction - Prepare a story
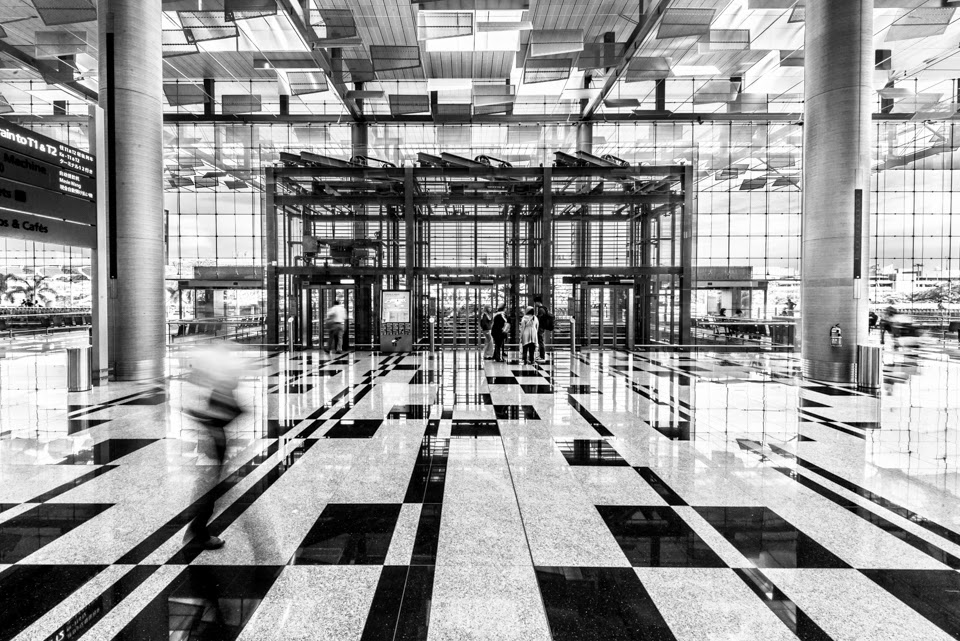
My favorite picture was this @ Changi Airport. And I was really surprised that it was the "cheapest" at Rp1.2mn? It was the first photo, and people weren't so sure what to expect.
I realized that if I had prepared, and explained the picture or the story of the picture, it would probably have done better, or given it more meaning.


5.Lessons from the Auction - People see pictures diff from Photographers?

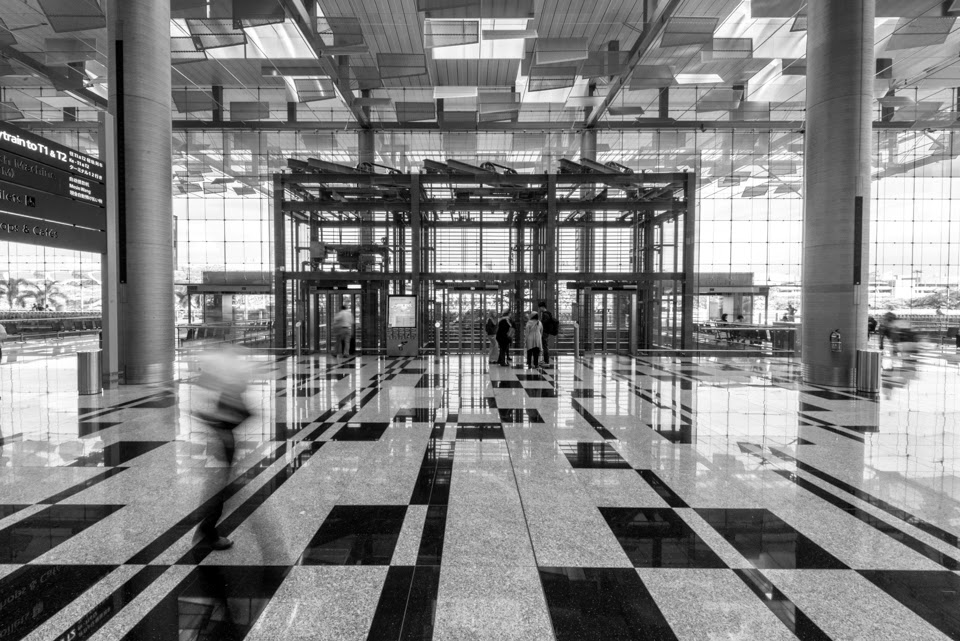
This was the picture which nearly didn't make it. I wasn't so happy with it - but surprisingly, this was hotly auctioned, and went for Rp7mn! and the 2nd bidder asked for a copy after too. I was completely blown away.

People seemed to like the B&W more, and suggested I shoot more of it. And it is partly because of the color being off, partly as they were mostly night scenes, and not the ideal golden hour.

But this gives me lots to think about. Maybe I will focus on B&W, which I love, but can't seem to find good enough pictures. I will need to work on this.

All in, besides this all for a great cause, it really was a big boost to my confidence that people paid money for MY photographs. I am really humbled. And I gotta keep working on my "craft" and keep shooting!


Tuesday, June 16, 2015

Lessons from Shooting Events

Shooting Events, aren't as "pretty" as landscape or holiday shots.
But I've been shooting quite a few recently - All Saints 20th Anniversary celebration (Men's breakfast; Dinner and Sunday Service); ARPC church camp, there's a few things I'd learned.

1. Background.

 The stage had a backdrop of projector screen. So if you shoot straight on, the background will be messy and very bright, and person cannot be seen so well.

So I had to shoot from an angle, pick a dark and relatively uncluttered background, so that the person's face can be clearly seen and stand out.


2. Moments/Expression.

I think a picture is more interesting when it captures a certain expression/moment/expression. So here, I wanted to shoot Philip and Judy together (coz they were obviously the VIPs), but waited till they laughed at something said - it makes them look better, and it's a picture that invokes an emotional response - you just smile.

Like here on the right, some interaction between the people you want to shoot, always works better.


3. Shoot long and go Candid

I spotted these 3 men all engrossed, but ended up with similar poses and shot it quickly.

As you see, I prefer candid shots, and sometimes, it is easier to shoot candids with a long(er) lens, in this case, 200mm. You spot, you shoot. and the Subject doesn't know or doesn't have time to respond to the camera!

But it is very much up to the person's preference.


4.White Balance

If you note, the pictures taken for All SAints (2nd and 4th) have a more yellowish tone. It is both a function of using orange gelled flash, light of the room. Although I do like a warmer picture, in hindsight, it is tend to be a bit more yellow. The 1st and 3rd picture, was shot under white light, and no flash. The colors come out more natural and nicer.
I still need to go understand better on using flash and color of ambient light.

5. Mixing it up.

Since I have the fish eye, I always use it when I want to capture "it all". Composition is also important, balance between the elements. In this case, the groovy lines of the carpet balances with the roof, and yet you can take the whole ballroom in.

 Here's another use of the lens I like, to shoot people sitting in a circle, which would be much harder to, using a normal lens. I went, took 5 sec, snap and off I went. Didn't have to get people to move around.
Here, again it is to play with the carpet and composition. Just a fun shot, with kids playing, and them having a "natural" reaction.

Have fun shooting, shoot what you like, shoot for yourself, and sometimes, that fun comes through, and you break the boredom of shooting boring shots.


Conclusion
Shooting events requires you to watch people, anticipate reactions. You have to observe lighting, be familiar with your gear and settings (you know what settings each lens require, instinctively), watch the background. I experiment, shoot from different angles and then pick and choose. Like the camp, by the time I reached the 5th day, I knew where I knew which angles/lens work better. And you are very much limited by the venue, so mix it up using different lenses.

I obviously have a lot to learn, but it was good fun (albeit functional) just shooting, learning, then shoot somemore.

Happy Shooting!

Monday, January 5, 2015

New Year Resolutions

It seems a good time to be making new year resolutions - let's see how many actually lasts the whole year! These are do-able, not too strenuous on time commitments... so here goes.

1.Print and Frame up 10 photos.
I cheat. I got 2 photos framed up by someone else (above is one of em), although the framing was very cheap - hanging up in my office in front of me - is quite nice! Photos were meant to be printed and enjoyed, and not just as a desktop wallpaper. IMHO. So I think there is space for 8 more. There's always wall space at home to be invaded too!


2.Intentionally shoot
Go out and shoot something intentionally once a month. More than just family shots, events or church pictures. I will (try) and make time (Saturday morning or an evening) to go out and shoot something.


3.Learn something on Photoshop.
I'm a complete newbie on Photoshop. Ok, I did learn how to post-process star trails,  But if I am to develop (*get it?*) I need to keep expanding all parts of my photography journey, and the weakest (well, amongst many other parts) link is my post-processing. I did buy a book last year, which I never quite got started - so I'm calling it - learn something (could be an simple action, but something I didn't know before) once every quarter! That should get me to chapter 4 by end of the year.

 
4. Attend a photography tour/workshop.

Ideally, twice, but let's start with just 1. I did a Bromo shoot last year, which was really really fantastic - in getting me out of my photography doldrums. It's great to meet other photographers and learn something practical.


5.Travel and shoot
I also tremendously enjoyed shooting in Bhutan (in my getaway with the wifey) last year. Nothing like a new place, culture to pique interest. Love it!


6.Shoot something different.
Last year, I learned shooting stars, dabbled in a bit of Infrared photography, and using fisheye.
I need to keep on trying the IR, learn to see architecture through the fisheye. Maybe I will try Macro photography (not bugs though, maybe seeing common everyday things in a different light) - which means I HAVE to buy a new lens... (hehe).


Do you have any resolutions that hasn't been already broken since 1 Jan?
Happy Shooting everyone!

Tuesday, December 2, 2014

Anatomy of a Shot


I was just in Singapore for a meeting, and as always, I bring my tripod and camera with me, because I find that there is always something interesting to photograph (grass is greener on the other side?)
Anyway, I was a little short on time, and didn't get to shoot anything, but when I got to the airport about to come back - I told myself that I HAD to shoot something, so that I didn't feel like I wasted the effort of lugging my camera stuff for nothing.

As usual, I'm drawn to the stark architecture of T3. 2 of the lift had the top covered by advertisements (urgh!), but managed to find one "naked", where I camped for 45min after checking in, and before having to board.

And just because it's been ages since I blogged, I thought I take a walk through the process of this shot, from beginning right up to the post processing.

First thing is to pick the scene, work on the composition of the frame. I wanted this lift to be the main focus of the shot, I liked the bare, industrial look of it, which fits in with the roofing, and the lines on the floor kinda lead to it. I took maybe 20-30 shots, trying out without filters, and with filters, various exposure times.

In the end, I selected this - coz I thought pictures without people looked too sterile and cold. The slow shutter speed gave a sense of movement - and the guy walking across, without blocking the lift was what I liked. A trick is that since I was camped there, all set up with a tripod and remote trigger, people will ignore you - if you pretend to look elsewhere. :)
 
Anyway, this is the RAW file.

 Due to the nature of the lens (wide angle), you will see that the picture is "bent". But Lightroom has now evolved so that it auto-corrects the distortion. One click later and you get


Pretty neat huh! All the bent lines (and pillars) all straighten out.

Next, I strip out the colors, cause it adds nothing to it. I just love black and whites.

Now, the problem is, because the window scene is very bright, the rest of the picture (indoor) is a bit dark. The lift is lost in the business of the picture - so my global (affects the whole picture) adjustments in Lightroom is to lower the highlights, increase the shadows, and boost clarity.


I still didn't think that the lift stood out clearly enough, so I "darkened" the bright window more, darkened the lift, boosted overall exposure to accentuate the dark lift against the white background. I actually spent a bit of time fine-tuning this via the black and white sliders - to give the final image right on top.

The lessons are:
1. Start with an image you are happy with in terms of composition - this takes time and effort to experiment with various settings/filters. 

2. Post processing is an important part of getting to how you envisage the final image to be. You will see that the final image is starkly different to the RAW. And whilst I don't really use photoshop, I am a big proponent of Lightroom - it is a important and very powerful tool - that is (almost) as important as the gear you use.

Happy Shooting!

Sunday, March 23, 2014

Anatomy of a Super Long Exposure Shot.


Holidays are the best times to explore and photograph new places.
Here's a shot of Rainbow Beach, just a stone's throw where we holidayed (in Gold Coast) just.

This is the EXIF: 16mm (as wide as you can go); ISO100 (native ISO, for the cleanest pictures); F16 (I always start with F16 in landscape shots); 446s (yes, that is more than 7 minutes).

Here's how its done.

Firstly, the key is composition. Take your time, look around, and find a composition that you like.
So I liked the dramatic clouds, foreground interests (big boulders). I decided not to go rule of thirds, and just shot the horizon at the middle, because I wasn't sure which I liked more - sky or boulders. In long exposures, the clouds are important, they are the paint brushes for the shot. But the foreground interest is the stability in the picture, that adds great contrasts. So I kept both.

Side note, shooting with the tripod in the sea - is difficult. I tried quite a few, but coz of waves, it ends up not tack sharp/blur. So I had to navigate through the boulders to find a spot for my tripod - stable enough, away from waves, and a decent composition.

Take your time.


So this is the first shot, without the ND filter. F16; 16mm; ISO100; 0.8s.
I love the ND filter, ever since I solved my light leakage problem, I was confident again in using this. A recap - this filter takes out 499/500 of the light hitting the camera sensor.
So if the shot above is 0.8s, with the filter, it should be 0.8 times 500 = 400 (or 6 min 40s). As the sun was setting, light was dropping - I let it go open for a bit more.

This is what I got.

I got this strange purple hue at the bottom right (the picture is already slightly corrected, but couldn't get rid of this) - so what I did was to convert it to Black and White - and you get the picture right on top.

So the ND filter smoothens out the water, giving you that milky tranquil feel. The clouds become your paint brush. It really is a trial and error process, you never really know what you are going to get. But if you don't try it, you won't know.
Also, with a 7 minute shot, you don't get many chances at this.

There you go. Keep shooting!

Monday, February 3, 2014

How a Hat solved my photography achilles heel


Since my trip to Australia in March last year, I've noticed that this line/purple hue appears whenever I use my Hoya ND400 filter (its a 9 stop filter which allows 1/500 of light through - to allow you to shoot long exposures) - see example above. Initially, it only appeared occasionally. Eventually, the filter fell apart, and I replaced it. I also upgraded my wide angle lens from Tokina 11-16 (DX lens) to Nikon 16-35 (Full Frame) lens. The frequency of the purple banding/line - became almost 100% - and asking my photography friends in Indonesia, in Singapore - no one had ever seen it. I didn't think it was the filter (since it was new, and also happened with the old filter), the lens or camera (since it doesn't appear when I don't use the filter).

This recent trip to Lombok, it appeared again! And I was determined to eliminate as many variables as possible, before I ditched the filter and adopt a new system.

So here's the normal 16mm shot, without filter.

The shot with the filter is right on top. Argh!
So, I tried it with a different lens - the 24-70mm. And this is the result:


ok, no problem right? Here's the same shot, with the ND filter.

Argh! So it definitely isn't a lens problem. Maybe a filter problem? I try the same shot, but this time, the filter is turned 90 degrees... to see if the line changes.

?!!! erm, three's no difference! I'm stumped. It isn't a problem with the filter, not the lens. I try searching on the internet again, and finally stumble on the problem - light leakage from the view finder! Its when you have light going through the view finder, leaking into the sensor. Its more pronounced during long exposures.

And so, since I didn't bring the view finder blocker (which I've never used) - I used my good old trust-worthy hat- and just hung it over the view-finder...


Voila! It works! Trying about 10 more different shots, the line is gone! Hurray!
Light leakage - it seems to be more camera specific, and happens with the D600 (didn't happen with my D90). So if it happens, use your hat!

Thursday, January 23, 2014

Exploring Lightroom 5's Perspective Correction


An interesting picture of one of Jakarta's main streets - Jl. Jend. Sudirman at right at peak hour. So I used a 10 stop Neutral Density filter, so the busy cars zipped by (slowly), leaving only bare trace of light trails.

And as I used a 16mm lens, you'll see the lens distortion - buildings aren't upright. And you'll need photoshop to correct it.

However, since the release of Lightroom 5, a new feature is the perspective correction - which I tried. So the "Auto" turns out like this:


Not too bad - the buildings are more or less upright, but maybe a little to much as the top looks bigger than the bottom.

There is a "Full" perspective correction, which makes the picture like this:


So.... not always turns out well.

Summary: It's a useful little feature, which is a one click adjustment. Works out some of the time - whether "Full" or "Auto", try and experiment to see which turns out better, or which you like better.
Is it worth an upgrade to LR5, if you have say LR 4? Prob not. But if you have it, use it.

Keep Shooting!
Soo Sing