Monday, June 25, 2012

How I Shot This (2)


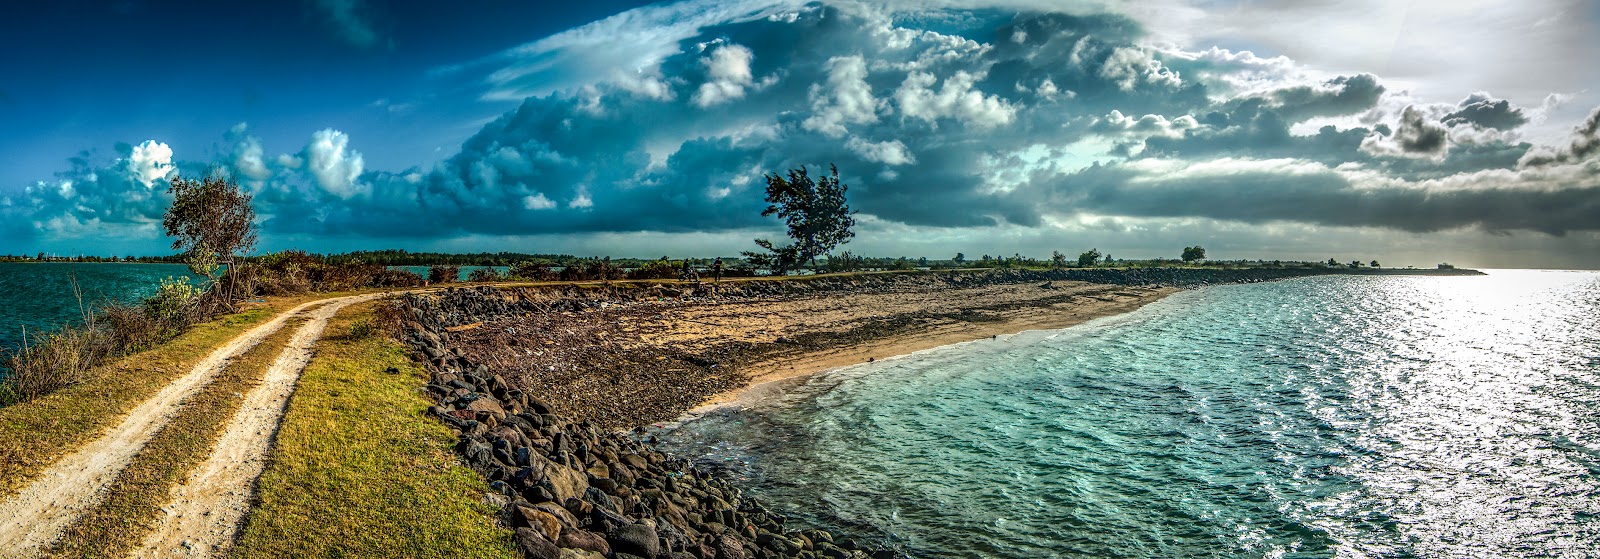
So, I was at Telunas Beach in Batam, and shot the above, which I really do like. Since Krystina asked how this was shot, this is 2nd of my picture "tutorial".

1.Timing
The most important thing is light. Best (and only) time to shoot landscapes is around sunrise or sunset. Since I'm not really a morning person, it's mostly sunset. This was shot just after the sun set, known as the "Blue Hour", as you can see why it is called that.

2.Equipment
A) Tripod
You don't need fancy equipment, but you do need a tripod. I never quite understood why, but after I bought it, then used it, I have to agree with many others that it is one of the best "accessories" to get, which will really bring your photography to another level.

B) Camera
I used my only DSLR I have, Nikon D90. Any camera that can shoot manual mode, is fine. I also like to shoot in Raw format, which I think is much better for any post processing.

C) Lens
I used Ultra Wide Angle lens Tokina 11-16mm. It's nice and wide, and very sharp. But I could have easily used my 18-200 for this shot.

3.Camera Settings
A) ISO
I always pick the lowest ISO available, when I want a long shutter exposure. So I picked ISO 100 - the lowest D90 has.

B) Shutter Speed
I didn't have a watch or phone with me, so I decided to stick to max of 30 seconds . Any longer, will be "Bulb" mode. You need a longer shutter speed when you have low light, or night shots. This has 2 effects

- Smooth Waters. Any water bodies becomes like glass.
- Star burst lights. Any light source, becomes star burst. Experiment with different aperture sizes, and see what works.

C) Aperture
So based on the above settings, I had to put aperture at F22, as my manual mode tells me as the right exposure. Some will say that above F16, there's diffraction. I've never seen any (to my naked eyes), so I'm not convinced that F22 is "wrong".

4.Composition
Besides light, the other thing to note is Composition
A) Leading Lines
What is interesting is the bridge leads your eye from the edge of the picture to the main object (huts).
I normally like going from the corners to the middle center-ish, but in this case, slight difference.

B) Rule of Thirds
Most folks will put the subject right smack in the middle. But if you put it a third off the middle (think of a tic tac toe grid, at any of the intersactions), the picture will look much better. So the Main Hut in the picture, is a third off.

5. Shoot!
So camera on tripod, composition sorted out, I used my timer (set to 2 seconds) and pressed the trigger!
The timer negates any camera shake, when you press the trigger. Sometimes I use a wireless trigger, you can also use a cable trigger - but a 2s timer also works fine.

That's it! Isn't so difficult, just keep trying and keep shooting!


Thursday, June 21, 2012

New Toy: Nikon SB700 Flash


I have decided to finally get a flash, to learn how to use one. I was contemplating getting a 3rd party Nissin i866 (more powerful, cheaper), but from a review and comparison of various flashes, the SB700 was recommended over the Nissin, and others.

Got it from Tokocamzone, which was great, coz I ordered it this morning, and 2-3 hours later, courier arrived at the office. Same time as it would take for me to go there and back. And Tokocamzone is the cheapest place in Jakarta to get photo stuff.

So here goes! I'm off to Batam (16th wedding anniversary, with fam and inlaws), batteries fully charged - and the experimenting/learning begins! If any pix comes out good, I'll share :)

Keep learning and shooting!

Wednesday, June 20, 2012

Playing with a D800 file.

In my quest to keep learning, I follow guys like Jared Polin, who has this Fro Knows Photo site, and does lots of photo video tutorials. One of the things he does is Fro's edit of the week, where you download a file, edit it, and upload it. This week, there was a D800 file, which I was interested to see and play with, so I gave it a go.


The file is huge - abt 32MB, or about 3 times bigger than the normal D90 files.

The Original RAW looks like this.


Here's a Cropped Version: Check out how much detail there is.

Add a little Lightroom: The image below is what I uploaded, using a preset I just found online.

Here's a Further Crop: Seeing how much crop this image can take, I cropped it more. The detail/clarity is insane!


Add a touch of Lightroom: I can see myself getting used to such big files. And the dynamic range should be quite nice too.


I'm going to see how the D600 turns out (should be out later this year), but I can see myself liking the D800 very much!


Keep Shooting!

Tuesday, June 12, 2012

How I Shot This (1)


I was at ARPC church camp @ Hotel Palace of Golden Horses, KL last week. And I walked around a bit, seeing what would be interesting to shoot. I saw the sun setting-ish, and thought it would make an interesting shot, so I shot the scene using my D90 + Tokina 11-16, setting it at 11mm, switched to manual shooting mode with aperture at F8; shutter speed 1/1250 (based on the sky exposure); ISO200 at RAW. I shot 6 shots actually, but only the middle 3 were used, see below.

Just note that this is w/o ANY processing, no in-camera or Lightroom processing, so it looks pretty dull. With Lightroom, I import all my pictures now using the adobe provided "Direct Positive +" preset. Due to the uneven light, I pulled my "highlights" slider to -100; "shadows" to +100; boosted the "clarity" and "contrasts" a little, and this gave me


So it's starting to look a bit better. Now, behind me, there's a "lake" so I couldn't move back. And I wanted all the palm trees in the picture, with a bit of space on the left - which is why I decided to shoot a few (6 in all). When I tried to stitch all 6, it was really warped/distorted, so I experimented with 1 less picture, until I thought the 3 looked best.

I use Microsoft's Image Composite Editor, which is the best free stitching program I've tried, and it gave me this. This is probably what the eye "naturally" sees.


But I wanted to give the clouds a bit more of a dramatic edge, so importing it back into Lightroom, I again pulled the highlights to -100 (to soften the brightness of the sun), shadows to +100 (bring out details in the shadows, else it is too dark); boosted the contrasts and clarity again (just gives more definition to the clouds, but the downside is that the trees look "artificial" with a bit of ugly halo, but it's a bit of a compromise) -it won't be everyone's taste, but I prefer it. There's this HDR quality which I'm not all that fond off on the trees, but I loved the effect on the clouds.

The end product is the picture right in the top!
This is for Bryan Kam, one of my photo mentors who helped me tremendously when I just started out, 1.5 years back, who was curious how I got the shot. So it's a step-by-step tutorial.

I just have to say Lightroom is a really great tool, and can't recommend it enough. It is easy to use, and very powerful (I'm only using the tip of the software's ability, and still lots to learn - thus my post processing isn't all that good, but I'm experimenting and learning).

Keep shooting and learning new stuff to try!

Saturday, June 2, 2012

How to shoot Panorama - with what you have!

There are times when just a single picture, cannot capture a scene, the breathtaking snippet of the wonderful creation of God. Other times, you just want to take a panorama (long, wide angle) shot, just for the hack of it, like me in the picture above.

You don't really need any fancy equipment. The above shot was taken with my D90 DSLR, with a Tokina 11-16mm lens - handheld. It could have easily been any decent point and shoot or even iphone. For the above, I shot at 16mm, shot with approx 1/3 overlap. Then I use Microsoft Image Composite Editor (best Free photo stitch software I tried), select which pictures (there were 8), and it automatically joins it all together.


Here's another example with just 4 pictures stitched together.


The above is a little more complicated. The first time I did, it didn't turn out so good. So I went back, mounted the camera on a tripod, swiveled it and methodically shot it. 19 pictures altogether. But because the panorama is so wide, any unevenness ends up distorted (the ground wasn't 100% flat, and the horizon wasn't 100% level. I tried the same shot, at 24mm instead of 16mm for the rest, and the distortion was significantly less. But too narrow.


Here's a 16 image pano. Not as much horizontal distortion. But due to physics, the parts closer to you (in the middle), end up more distorted/very close together, sides stretched out. And I should have shot a bit more to the right, and have the whole tree in.

I managed to take about 20 different panoramas, and processed all of them, and here's what I learnt:

1.Timing: sunrise or sunset. Those are the best times to shoot, the light is just gorgeous, not too harsh.You get a nice warm glow.

2.Camera settings: Manual mode completely. No auto mode, so that the exposure is exactly the same, or you'll end up with pictures that are patchy and inconsistent. Else, you end up with different exposures, and patchy pictures after you stitch. Oh, shoot Raw. There's just so much more data available to use later in post production.

3.Expose for the bright areas. The exposure is tricky, in such a wide panorama, do you expose for the sun/brighter areas or darker areas? I chose the brightest area, so that you don't have blown highlights (check also histogram)- you can always bring out details out from dark areas, but once it is lost/blown out, there is no data there to bring out. So I used F16 (bigger number is good, means small aperture and everything is clear), 1/30s shutter speed (what the camera says is right exposure) ISO 100 (lower better, for low noise), manual white balance (I used sunny), and manual focus (use auto to get the right focus, then move it to manual).

4.Tripod is necessary for very wide panos. Optional for those with fewer pictures. For really wide panoramas, you need the tripod (so that you don't have gaps). Or you can try experimenting hand-held. But on a tripod, I make sure that I can capture what I want, from the start to the end.

5.Overlap by at least 1/3. I take the first shot, if it looks ok (exposure, composition), I shot a shot every 15 degrees. You need at least 1/3 overlap between pictures- more better. As per my comments in the 4th picture, I think if you have more pictures, with more overlap especially in the middle/closest to you - you will have less distortion, and a more natural pano.

6.Shoot portrait. Unfortunately, all my shots were shot landscape. And you get gaps, esp at the corners - like my 3rd picture above, the trees got cut off, as it just wasn't tall enough. What I should have done is, shoot portrait, give lots of room around what you want to shoot, then you can crop in later. If you have gaps, then you're stuffed, and the effort is wasted. You'll end up with more pictures, but again, better more/excess than less/shortage.

7.Use a normal lens, not Ultra Wide Angle lens. The UWA (tokina 11-16 f2.8) is a great lens, very sharp. But for panoramas, the distortion is in proportion with the number of pictures to be stitched together. See above pictures, the 4 image has the least image distortion. 8 image has more, and the 19 has just too much. So if you have just a kit lens, that should be fine. You need a small aperture anyway (big F number).

8.Post Production: Check exposure. I use Lightroom, and I look at the brightest picture, and fine tune it. Then I copy the settings to all other pictures to be used in the same pano. For a few, when the light shift too much, I had to manually tweak the light levels (only), so that it looks even across.

9.Post Production: MICE to stitch. Easy, fuss free, and fast. I import into Lightroom again, for a final touch up, but it really isn't necessary.

Voila! A Pano to capture the scene you want.
Keep Shooting!