Wednesday, July 25, 2012

How to appear better than you really are

Don't post bad pictures.

D'uh.

Everyone takes lots of pictures, and lots of them turn out to be bad pictures. It's normal.

Ok, it isn't so great, if all your pictures are bad. But if you think all your pictures are good, time to take a humble pill or change your spectacle prescription. :p

Anyway, I take lots of pictures. For most everyday pictures, I would take 3-4 pictures - from slightly different angles, try different settings, or if I think the picture has potential, I'd take hundreds. Yes... hundreds.

But I cull mercilessly. It's a good day, if 5% of my pictures make it to facebook.

If you want to show many of the same or similar shots, consider doing a montage, or a series of shots (see bottom picture for example). Try not to post numerous mundane average looking pictures which look all pretty similar.

If you only post your best pictures, people actually think that you are far better than what you really are! Shh... that's just our little secret :)

Anyway, I typically post these types of pictures:

1.Nice shots


The kind of shots you are proud of, and can look back and say - hey, that's not too bad!
For this, I took nearly.... 200 shots over 2 sunsets, and selected what I thought was the "best" one of the lot.


2.Memorable Shots

The kind of shots where the occasion was interesting or memorable, but the picture wasn't so great. Like this ugly looking thing on the right - my son caught this sea snake on a fishing line at night. Not a picture to win any awards, but the occasion was memorable. And yes, there was only ONE picture of this ugly thing, not 5, or even 2.

So other examples are some of my wedding shots, like the exchange of vows, the kiss, etc - some of these didn't come out as nice and sharp as I'd like - but - it's a memorable occasion, not something you can redo. So that'll have to do. Doesn't have to be the best shots, just hopefully not "bad".

There are times when a picture by itself isn't so interesting, but I do want to tell a story. So I combine a few into a frame.


So keep shooting, trying different things, learning (I don't believe the journey to learn ever ends) - and most importantly, have fun!

Thursday, July 19, 2012

Basic Composition Tips - Learn em to Break em!

One of the first ways to improve your photography, is really the composition of your photographs.

3 of the oldest "golden rules" are: 1) Rule of Thirds; 2) Leading Lines; 3) Patterns
To this I'd add: 4) Look for the Unusual.

1) Rule of Thirds. 

Here's a simple illustration. Typically, you'd take a picture and have your main object smack in the middle (see left). Imagine 4 tic-tac-toe lines cutting across the image (cutting it into 9 parts), rule of thirds say that the picture looks better having the main object of focus at one of the 4 line intersections. So for the picture of the right, I placed the flower at the upper right intersection, which I think improves the composition significantly.

Here's another illustration. It works especially with portraits, where I always give space where the person is looking at. So the picture on the right looks much better with the empty space on the right in front of the bride, rather than behind the bride on the left.


2. Leading Lines

Especially for landscape shots, it'll be nice to have something guide your eye from the corner of the picture to the main object. This picture above is an example, where the net starts from the bottom corner, and you follow it to the middle. Notice also the main kelong being off center (not quite 1/3), but it looks better than just having it right smack in the middle of the picture.

So if you are taking any landscapes, look out for fences, or other things which would lead the eye to the main object in the picture.

3. Patterns

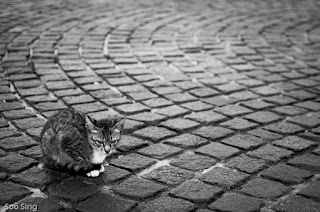
Look out for repetition. Whether it's the floor you are walking on, in a mall you are in, look around you - the ceiling, at the escalators, at people. Patterns are interesting. So the cat picture, has interesting floor tiles, and I've place the cat using the rule of thirds - rather than right smack in the middle of the picture, as one would naturally be inclined to do.

You'll find patterns and repetition all around you. You just have to look out for it.


4. Look for the Unusual

What I like to do, is to see if I can shoot something in an usual way, or a way you don't normally see. There is a lot of trial and error (just shot, costs you nothing in digital), sometimes it works, often it doesn't - but the more you try, the better chance for you to come out with interesting shots.

The left picture, is interesting because, it is shot from a different angle/point of view (plus note the rule of thirds?) - which would be very different if I had just shot this from the side.


So you go to a famous landmark? Don't shoot it how everyone would shoot it, or see it. Find a different view point, pay attention to patterns, leading lines, rule of thirds. Learn to see things differently, and your pictures will come out... different! So the Colosseum has probably been shot to death. So I chose to try out shooting it at night, using long exposure.
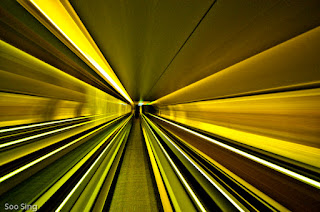
Be willing to experiment, and try things. I read a lot, and see what others in the photog world does - and try em out. This future like picture on the left, combines both patterns, leading lines and bit of rule of thirds (the focus of the picture is not right smack in the middle).


5. Learn to Break the Rules
Last but not least, after you know the basic rules of composition, break them! Don't always stick to the rules, different things - the last you want is for all your pictures to look formula-ish/boring.

Wherever I go, I carry my camera (mostly), I keep looking out for interesting things/people to shoot - and I keep shooting!

Sunday, July 15, 2012

First Portrait Shoot


Here's my first "portrait shoot" for Matt, who wanted a CD cover for the single he's going to release. He used another picture from elsewhere finally, but that's beside the point.

This was a week before my wedding shoot, and again, I had no idea what to expect. I've always shot candid shots. This isn't as challenging as a wedding shoot, but again, it's a whole different kettle of fish.

Anyway, Matt didn't have that much of an idea of what he had in mind. I listened to his song, and thought something contemplative was appropriate, and thought of something clean, simple (I asked him to bring a white shirt, and others, to try). He picked the place (Food for Thought at Botanical Gardens, Singapore), and we met there.

I did realize that people management is probably key - getting someone to relax, to smile naturally in front of the camera, is probably a skill in itself. Matt was game for anything, so we shot in the courtyard, inside the cafe, out in the gardens. I used mainly my 24-70 f2.8 and 80-200 f2.8 to shoot. I took quite a few, just to see where was Matt's "good" angle. I also experimented with my flash, with and without colored gel.

My personal favorite was the above, Matt sat on the inside of the cafe looking out. I shot from the outside, and framed the reflection and light - so as not to obscure his face, and him looking distinctly "contemplative".
Anyway, it was good fun, and good learning experience for me.

Nothing ventured, nothing gained!
Gotta keep shooting :)

Monday, July 9, 2012

1st Wedding Shoot Reflections


A good photographer friend (Bryan Kam) asks if I'd be interested to shoot his wedding - he didn't look like he was joking, nor was he running a fever, so, nothing ventured, nothing gained - and I said yes of course! The only proviso was, I've never shot weddings before, so as long as he had a someone else taking the main event, I'm just a newbie taking, expect nothing and you won't be disappointed!

I can tell you I've never been so stressed in such a long time! Here's a list of learnings from me.

1.Equipment
I decided to try out Bryan's D700 paired with 24-70 (perfect combo!), together with my own D90 (which I used with ultra wide angle Tokina 11-16, switching with telezoom Nikon 80-200).
So the moment I reached Bryan's place in the morning, I spent half hour, going through the D700 settings, of which I think 80-90% are the same/familiar.  So we're set!
I had also just started trying to use a flash. So I was experimenting shots with flash and without, and starting to like those with flash.

Bad, bad, bad.
A.Underexposure. 
The exposure was all over the place, the screen shot often showed it under exposed at least 1 stop. So I had to keep looking to manually adjust the exposure.

B.Shutter speed
The D700 kept shooting at 1/15, when I shot at Aperture. I had set it to shoot at a min of 1/60, and to bump up ISO instead. It did not. I tried manual exposure, but when I inserted the flash unit, it really messed up the exposure meter. I had NO idea why, and no time to figure out. Just kept at Aperture priority; TTL and hoped for the best!

But not all is bad.
C.Lenses
Well, I can say that the 24-70 fits FX much better than my DX. It felt more natural, and useful range.
I also liked my 11-16 ultra wide angle shots. These were the 2 most used lenses.

I'm not sure I'm brave enough to go primes, although a 85 F1.4 would be nice (in theory).

D.FX Camera
To be honest, I couldn't tell the diff between FX and DX cameras, and even pictures (besides heavier, fast fps). So having that itched scratched for a while, going full frame isn't as much of a lust. But having 36 mega pixels and vast dynamic range is still so so tempting.... :)

E.Auto-focus points
I used to think having more AF points was great! Going from my D90 of 9, to D700 of 51 - gosh, what a jump, but not a good one. I'm used to manually selecting the focus point, and having to zip through so many AF points, is slow and tiring.

So I now know, what I need is not more, just points to cover more of the viewfinder.

F.Flash
Again, thrown into the deep end of flash usage, I realized that I did like the shots with flash better than those without (I shot a lot of shots, both with and without). The DEMB diffuser was great, and experimenting with it, somehow I liked when the diffuser was in front of the flash. The flash gets reflected from all the walls to the subject, so fills the shadows, without the harsh light.

After this, I am now a flash convert. Now to really learn how to use one well.

2.No Room for Error
If you are doing this for a job or paid, there really is none.
For landscape, when I spoilt a shot, I could go back the next day/time to try. But you can't really ask the couple to redo the entire day again! You get one chance, that's it!

3.Changing Light
The day passes really fast. You move indoors, then outdoors, light changes very quickly - there is really little time to think too much, you'd have to just snap - almost on instinct - and hope it all turns out!

4.Having a Checklist
This being my first wedding shoot, I wasn't so sure what to really expect, and what to do. So I really just went along and shot candidly, documenting what goes on, tell the story.

If I ever wanted to do wedding shoots seriously (I don't), I'd definitely have to come out with a checklist, and make sure I cover those. Including scouting out the premises before hand.
There are things which I realize, I could have done, to make it better are some of the more detail shots - cliche as it is- will be nice: picture of the wedding bands, shoes, bride getting ready, groom getting ready.

That said, to be really good, you'll need to move beyond the cliches, develop shots which are different, and having your own style to it.

5.Managing People
Also, a real wedding photog, will also need to know how to manage and pose people. I'm not so comfortable doing that yet, it really is a different kettle of fish. But I'm glad to have watched the pro (Alex) do it.
I'm also very blessed that the bride Kristin Ooi, was fantastic in front of the camera. She always smiled for the camera, and had a gorgeous one too! Interestingly, her dad also "posed" for the camera, when he saw one pointing at him. But he gives this expressionless deep stare, which makes for a great portrait!

6.Fighting for Space
One of the interesting things, was trying to find space. When Bryan was getting his bride, there were 2 videographers, and 2 photographers buzzing around (paparazzi!). So hard to get shots without someone "unnatural" in the shot. It was a lot better when we went to the church, where we could all find our own space.

When I was shooting tea ceremony, I had to jostle for space a little, with the relatives who also wanted to take pictures, in a small space. So I had to be polite, say excuse me, gently nudge my way to where I could shoot.
Side note: I did cringe whenever I heard "we'll let the professional take the picture", when it was just me there! Good thing the wedding couple didn't let the cat out of the bag!

Final Thoughts
It was a nerve wrecking experience - but I must say that I've learnt a lot from it, more so than reading any books/articles, or even buying new equipment unsurprisingly. So thanks to Bryan and Kristin for giving me the opportunity to shoot - they were indeed very brave (and foolish!) to entrust such an important event to a newbie!

And it was nostalgic for me to be back at Prinsep St Presby Church, where I got married 16 years ago.
Marriage is such a wonderful gift from God, I'm so thankful to God for my wife, whom I love more and more as each year passes.

To Bryan and Kristin, have a blessed life ahead. This is only the start - the Best is Yet to Be :)