Still feeling quite uninspired. So I've been reading (Zack Arias blog; Joe McNally's The Moment It Clicks, and now started on David Duchemin's Within the Frame, which by the way is an EXCELLENT book), and got me thinking about my own photography journey.
I've realized that right now,
1.Technical know how
I have a lot more know how, both in theory and practical - well, at least more than say 1 year back.
I do know how to use my camera, I know a lot of the functions within the camera. I'm really quite happy with the gear I have, no particular yearnings to go get more stuff (a rarity!).
To broaden my horizons, I've tried a few things:
a) HDR (not particularly keen);
b) Brenizar method (1 trick pony which I'm not very good at);
c) Light painting (if used properly, could be interesting)
d) "Time Splicing" (whatever it is called, where you take a picture that transitions from day to night - takes time), but you do need a nice cityscape to carry this through. On the look out.
e) Panning (not very good at, need more practice) - something which doesn't replace having good composition
f) ND filters - love using this. But need great composition to carry this through.
g) Flash - knowing how to "manipulate" light properly, is one BIG learning curve, which I am but at the beginning. Something to keep practicing and learning.
I think it is useful to know these things, as tools to a trade, you learn how to use them, but use them only when they are useful. And in no way do they replace the need for great composition, and a great picture.
And I've been taking a lot of technically ok/functional pictures, which are otherwise quite uninspiring.
2.Things I'm NOT into
a) Macro, insects, flowers
This is a whole different field on its own. I'm fascinated with some really good insect close-ups, but on the whole, this genre is not something I'm that interested in.
Possibly I might get a Macro lens to go shoot some strange close-ups, Iris, bible, make the familiar unfamiliar. Not right now.
But show me another picture of insects making out, and I'll SSSSCCCCCREEEAAAMMM!!!!
b. Studio set ups, multiple light sources
Just need to master using ONE light source (flash) plus ambient light first.
c.Architecture
I actually do like this, and first thing that I do when I walk into a new building is to see if there is anything interesting or angles I can shoot at. But architecture by itself, is starting to feel like there is little "meaning" , its could be a cold picture of an interesting architecture, but really it is hard to connect with it.
d.Stock photography
It's tough to even get accepted! I tried at 2 of the largest stock agencies, and failed. Too lazy to retry.
What they look out for, is completely different. It's not art, not vision, but technical perfection, and what would sell. It's not going to get me too excited about photography. So foggitabbodit.
e.Shooting for competitions/award/praise?
It was nice at the beginning (GPI, Pixoto, Podiumfoto, etc), bit of an ego booster. But I want to shoot pictures I can be proud off, not to please others or to "win" awards. I'll still enter, if I think a picture is good enough, but it'll be very much a by-the-way thing.
3.Things I want to shoot
I want to shoot pictures which have meaning, if not to others, at least to myself. I want pictures to speak to the viewer. It's a goal which I've yet to even
a) Family
I always want to shoot them, events in our lives, because they have meaning to me. Boring yes, but great to remember stuff.
b) Cityscape & Street
It's where I live. I want to express what it is like living in a place, through a photograph.
Maybe I will start a theme, like people taking public transportation.
c) People
I realize I like portraits. Portraits of the old guy with years engraved on his face. Portraits of people around me - whether through their expression or lack there of, you can tell something of the person. Maybe environmental portraits, where it sets the person in a context of where they are, or where they live. I have a feeling a lot of this will be in Black and White. I love B&W photos.
d) Landscapes
It's always about composition and light. Capturing a great scene, with great light, is magical. I will always be on the look out for this.
e) Style
Starting out, I was trying lots of different things, different post production. But I'm beginning to think about shooting that is something characteristically me. I don't have enough experience to have a style, but just something to think about.
And it starts with post production. I love black and whites, so I'll always have that. And for color, I probably will start to lay off the gimmicky filter looks. Try and post pro much more subtly. nuanced, rather than much more obvious post pro I've done in the past (inspired by Zack Arias).
f) Vision
I want to see, to really see. I think I still will keep shooting whatever, but to learn to see pictures, see the unfamiliar, to shoot pictures with soul, pictures that will speak to the viewer by itself. I'm quite inspired by David duChemin's book, and only at the beginning. I'm not even there yet.
so uninspired that I had to write it all down.
Let's see.
Wednesday, November 14, 2012
Sunday, November 4, 2012
Take a walk when you hit the wall.

I've been feeling that I've hit a photographic wall.
For the past few weeks, the pictures have been just functional, nothing too inspiring or creative.
So I took a walk home.
Carried my tripod, got my camera ready and my landscape lens (11mm) -and observed as I walk.
How things look different when you walk. You take the time to look, see lines, see people - whilst braving the smog and traffic.
I don't think I'm over that wall, at least I think I got 1 decent (not terrible inspiring) picture out of my walk. Just standing there at that junction, with cyclist, drivers and pedestrian looking at you crazy, seemed strangely liberating. Time seemed to slow, as the cars whizzed by.
Going to try the same walk again, this time with a street lens (35mm), and see what transpires.
So, when you hit a creative wall, go take a walk. May not do much for your photography, but it may give you a different perspective of the city you live in.
Just keep shooting.
Wednesday, October 17, 2012
D600 First Look

Getting my D600, was a "monumental" event in my photography journey.
It's the latest IT camera, cheapest full frame, and 2nd best rated sensor (just a tad shy of the D800).
The D90 isn't a bad camera, but had its limitation in dynamic range and ISO performance. Auto-focus wasn't great too. So I was really looking forward to the D600, which came here to Jakarta at a great price, and no crazy queues like D800, so with my wife's blessings, I took the plunge.
External Bits - the good
1.Controls
I like having more controls on the outside.
Now, if I use the remote, there is a dial for it, rather than having to go through menus, and reset by itself.
The same dial allows one to also go to mirror lock-up, which minimizes camera shake even more - a feature that the D90 didn't have.
2.2 SD card slots
There's been a few times, where I take out the SD card from the D90, process it, and forget to put it back, and have those "D'oh! No memory Card" moments. A little frustrating to say the least.
Now with 2 SD card slots, I will always have 1 in there as backup, even if I forget to put it back.
3.File sizes
I used to fit about 1000 pictures (RAW) in 16 GB card. I fit 250 now. So picture size is about 4 times?
I havn't yet read the manual, so not sure if I'm comparing light for light.
Processing is a tiny bit longer, but my computer can handle it so far.
But nice to have a few more pixels to crop.
4.U1 and U2 settings.
Customizable settings. This was useful when I was shooting my son playing basketball. Aperture priority for normal shots, but a quick switch and I shot in my "sports" mode (min shutter speed of 1/500, aperture mode). Handy.
5.Clip to hold battery in place
When you open the battery cover, there is an additional little clip to hold the battery in place.
Neat.
6.Weight
Despite it being full frame and having all the latest whistles, it doesn't feel much heavier than the D90.
7.Lens compatibility
Ready to ditch my 3 crop sensor lenses (Nikon 18-200; Nikon 35mm f1.8 prime; Tokina 11-16mm); I find out that my 35mm f1.8 and Tokina 11-16mm (at 16mm) can still be used in full frame mode (and no vignetting)! Wow! That'll save me a bundle. (below is a sample of Tokina lens at 11mm (left) and 16mm (right). There is some distortion (not unexpected), but still usable - at least until I splurge for a full frame equivalent.

And I've found the 24-70 lens (which was a bit of a white elephant previously) - the perfect lens for full frame.
For my son's basketball, where the action is fast, it is just the perfect range for it, and everyday use.
External Bits - the bad
1.Battery Cover
This comes off too easily! Just opening it, caused it to come right off (25% of the time).
I charged my battery one night, and the next morning, realized the batter cover was missing! I searched high and low, at home, the car and the office. The official dealer didn't have the part yet (since the camera is new!), so was really kicking myself for losing it, and ruining the weather sealing.
Strangely, it appeared on my dining table a few days later (the housekeeper must have found it somewhere and put it there).
2.Eye piece
It must be me, but this dropped off only in my 2nd week of owning this.
Gone. I don't need it per se, but it is irritating. (I also lost the D90 piece, but only after 1.5 years).
Internal Bits - the good
1.ISO.
This is a picture shot at ISO 6400. Wow, it is at least as good as my D90 at ISO1600, possible ISO800. Who's afraid of the dark? :)

I shot my son's basketball game, and light not being great, to shoot at 1/500, 2.8, I had to boost the ISO to.... ISO12800! Impressed yet? Still usable at ISO12800 (to be used only in emergency). For the D90, ISO3200 was already rubbish (worse than below).

The ISO also goes down to 50. So the picture right on top is shot at ISO50. Nice!
2.Dynamic Range
I shot this around 2pm, blazing sun. Trishaw/Becak stopped under the tree, and I took a shot. When I looked at the LCD, I couldn't see anything in the becak, just black - due to the contrasts. Boy, was I surprised when I opened the file in Lightroom, and lo and behold - the details are all there!
The dynamic range is just fantastic.

3.Depth of Field
The advantage of the full frame is larger sensor, and more shallow depth of field.
But to be honest, I havn't shot a lot of wide open pictures (I have to use my 50 f1.4 more!), so at this moment, can't say that the difference has jumped up at me. So jury is still out on this.
(70mm, f2.8; ISO125; 1/200)

The D600 auto-focus rocks.
With the D90, even with spot focusing, it'll sometimes mis-focus.
Again, with my son's basketball game, fast moving, quite a few people running around, all the 3D tracking worked wonders, and I was able to get my son in focus most of the time.

Conclusion
To say the least, it's a fabulous camera.
I've yet to read through the manual, to fully learn what this can do. But so far, it can everything a little better. And am sure there's a lot of it I havn't even scratched.
But it is only a tool to use to take pictures. Sure it helps you do the job a little easier.
What really matters is that you keep using the tools you have. Learn its limitations, and shoot.
So my first take on the D600. Now to go on shooting!
Keep shooting.
Tuesday, August 14, 2012
Street Photography Tips
Last weekend, I met up with other Indonesian Photographers (part of a group called Motoyuk) for a Fixed Focal Length Challenge (where you are supposed to shoot with only 1 focal lenth, or use a prime) at Ancol, North Jakarta. This is the 2nd time I was joining them, the first time at Monas.
I love street photography, going around shooting candid pictures of strangers in public.
It can be a little unnerving at times, because you never know how strangers will react. I'm also terribly afraid of being robbed or beaten up! So first rule of street photography is
1.Know your surroundings, always be alert.
Where possible, I keep my camera in the bag, and observe people around. In a "slum" area, I would be more hesitant to whip out my camera to shoot, or even just on the streets at night. So joining other photographers is a good way, and at Ancol - there were tons of others taking pictures, so it was perfectly safe.
2.Know your equipment, get your settings ready.

I shot with my favorite 35mm f1.8 lens, which is small, light and inconspicuous - great for street photography.
When you shoot on the street, you'll be looking at candids, interactions of people, and anything else that catches your eye. You'll need to be quick, as you need to snap as you see the moment. Often, there isn't time to try and figure out your camera settings, or ask your subject to wait.
So know how to quickly change your camera settings to what is suitable (focus points, ISO, aperture).
Although I have a f1.8 lens, the depth of field is too shallow, for a quick snap. I often go around with F4, and shoot in aperture mode. Then snap away before they notice!
3.Shoot from the hip
 There are times you want that candid moment, and the moment you lift up your camera, the subject immediately reacts. So when times like that, I try shooting from the hip, i.e. I sling it, let it dangle at the hip, and as I walk by the subject, I snap away, whilst looking elsewhere - try as natural and inconspicuous as possible. RESIST the impulse to check your camera immediately, but as you walk away, then check.
4.Chat up your subject.


I also spotted this group of folks fishing. I asked about what bait they used, whether they caught any fish (they did, and then they showed off their catch to me) - then I smiled and snapped away, saying "I'll take a picture ok?" Which they gamely replied - "sure"!
5. Pay attention to your composition, when you can.

So do give it a try. Experiment, and see what works for you. But keep shooting!
Monday, August 6, 2012
Learning the Flash #1

So I read 2 books - Bryan Petterson's Understanding Flash Photography and Joe McNally's Hot Shoe Diaries.
I loved Bryan's first book - Understanding Exposure, really helped me to shoot in manual mode, and understand a lot about the camera and photography.
For his book on Flash Photography, I must say that the pictures he posts, are quite... underwhelming. I flipped through it before, months back, and decided that I wasn't convinced about using Flash, from his examples. But after I got my flash, it was selling at the airport, and I needed to read something - so I got it anyway. He strongly advocates using the flash on manual (forget TTL), and whilst technically good, I'm not so convinced that he's the best ambassador for Flash Photography.
Whilst struggling through Bryan's book, a friend recommended Joe's book, and kindly lent me a copy. Joe's book, are filled with fantastic examples on how to properly use the flash. He is a TTL kinda person (which I was relieved!), and I really like his pictures. He really knows how to shape light, and bring out the best using the flash. I'm still halfway through the book (it's 300 over pages), but it's quite inspired me to really give Flash photography a real go.
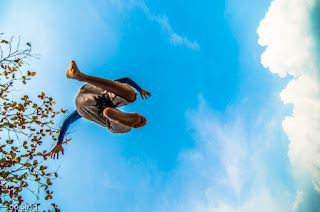
So, the boys and I went down to the basketball court last Sunday evening. We had great fun shooting. I noticed the light was beautiful, and decided to try shooting using the gorgeous golden light. Anyway, as the sunset, I broke out the flash, tried shooting on camera, off camera, with diffuser on, with the orange CTO gel attached - and without. My son was great in jumping over and over again, doing different things, different angles. But I must say that I did like the shot above.
I shot in shutter priority, setting it at 1/1000 at first, before lowering to 1/500 as the sun set. I wanted it to be fast enough to freeze my son in mid air. I used the Tokina 11-16mm, and the largest aperture was F2.8, so I used that to allow the most light in, plus pushing up the ISO.
Flash was off camera, on the floor with orange "gel" (actually a plastic diffuser that came with the flash, normally used for incandescent lighting) attached - giving the impression of the warm glow of a sun set - set to TTL (auto mode) and told my son to go for it!
One limitation was that since I was using my on-camera flash as trigger, the flash had to be on the left (where the sensor is), and in front of the camera. I worked with it, but was limited in the angles I could shoot. (once I'm much more serious in flash photography, I might go invest in wireless trigger that can TTL sync).
And I liked the orange glow of the net and my son, in contrasts with the blue sky. This would have been an impossible shot to shoot, without a flash. I'm now convinced even more, that it is essential to practice and try and master the flash! There's a time and place for available light shooting, and time and place for the flash - when used properly.
Keep on learning and shooting!
Wednesday, July 25, 2012
How to appear better than you really are
Don't post bad pictures.
D'uh.
Everyone takes lots of pictures, and lots of them turn out to be bad pictures. It's normal.
Ok, it isn't so great, if all your pictures are bad. But if you think all your pictures are good, time to take a humble pill or change your spectacle prescription. :p
Anyway, I take lots of pictures. For most everyday pictures, I would take 3-4 pictures - from slightly different angles, try different settings, or if I think the picture has potential, I'd take hundreds. Yes... hundreds.
But I cull mercilessly. It's a good day, if 5% of my pictures make it to facebook.
If you want to show many of the same or similar shots, consider doing a montage, or a series of shots (see bottom picture for example). Try not to post numerous mundane average looking pictures which look all pretty similar.
If you only post your best pictures, people actually think that you are far better than what you really are! Shh... that's just our little secret :)
Anyway, I typically post these types of pictures:
1.Nice shots

 2.Memorable Shots
The kind of shots where the occasion was interesting or memorable, but the picture wasn't so great. Like this ugly looking thing on the right - my son caught this sea snake on a fishing line at night. Not a picture to win any awards, but the occasion was memorable. And yes, there was only ONE picture of this ugly thing, not 5, or even 2.
So other examples are some of my wedding shots, like the exchange of vows, the kiss, etc - some of these didn't come out as nice and sharp as I'd like - but - it's a memorable occasion, not something you can redo. So that'll have to do. Doesn't have to be the best shots, just hopefully not "bad".
There are times when a picture by itself isn't so interesting, but I do want to tell a story. So I combine a few into a frame.

So keep shooting, trying different things, learning (I don't believe the journey to learn ever ends) - and most importantly, have fun!
D'uh.
Everyone takes lots of pictures, and lots of them turn out to be bad pictures. It's normal.
Ok, it isn't so great, if all your pictures are bad. But if you think all your pictures are good, time to take a humble pill or change your spectacle prescription. :p
Anyway, I take lots of pictures. For most everyday pictures, I would take 3-4 pictures - from slightly different angles, try different settings, or if I think the picture has potential, I'd take hundreds. Yes... hundreds.
But I cull mercilessly. It's a good day, if 5% of my pictures make it to facebook.
If you want to show many of the same or similar shots, consider doing a montage, or a series of shots (see bottom picture for example). Try not to post numerous mundane average looking pictures which look all pretty similar.
If you only post your best pictures, people actually think that you are far better than what you really are! Shh... that's just our little secret :)
Anyway, I typically post these types of pictures:
1.Nice shots

The kind of shots you are proud of, and can look back and say - hey, that's not too bad!
For this, I took nearly.... 200 shots over 2 sunsets, and selected what I thought was the "best" one of the lot.
For this, I took nearly.... 200 shots over 2 sunsets, and selected what I thought was the "best" one of the lot.
 2.Memorable Shots
The kind of shots where the occasion was interesting or memorable, but the picture wasn't so great. Like this ugly looking thing on the right - my son caught this sea snake on a fishing line at night. Not a picture to win any awards, but the occasion was memorable. And yes, there was only ONE picture of this ugly thing, not 5, or even 2.
So other examples are some of my wedding shots, like the exchange of vows, the kiss, etc - some of these didn't come out as nice and sharp as I'd like - but - it's a memorable occasion, not something you can redo. So that'll have to do. Doesn't have to be the best shots, just hopefully not "bad".
There are times when a picture by itself isn't so interesting, but I do want to tell a story. So I combine a few into a frame.

So keep shooting, trying different things, learning (I don't believe the journey to learn ever ends) - and most importantly, have fun!
Thursday, July 19, 2012
Basic Composition Tips - Learn em to Break em!
One of the first ways to improve your photography, is really the composition of your photographs.
3 of the oldest "golden rules" are: 1) Rule of Thirds; 2) Leading Lines; 3) Patterns
To this I'd add: 4) Look for the Unusual.
1) Rule of Thirds.
 Here's a simple illustration. Typically, you'd take a picture and have your main object smack in the middle (see left). Imagine 4 tic-tac-toe lines cutting across the image (cutting it into 9 parts), rule of thirds say that the picture looks better having the main object of focus at one of the 4 line intersections. So for the picture of the right, I placed the flower at the upper right intersection, which I think improves the composition significantly.
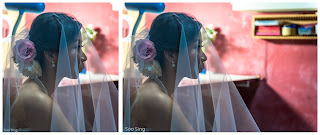 Here's another illustration. It works especially with portraits, where I always give space where the person is looking at. So the picture on the right looks much better with the empty space on the right in front of the bride, rather than behind the bride on the left.
2. Leading Lines
 Especially for landscape shots, it'll be nice to have something guide your eye from the corner of the picture to the main object. This picture above is an example, where the net starts from the bottom corner, and you follow it to the middle. Notice also the main kelong being off center (not quite 1/3), but it looks better than just having it right smack in the middle of the picture.
So if you are taking any landscapes, look out for fences, or other things which would lead the eye to the main object in the picture.
3. Patterns
 Look out for repetition. Whether it's the floor you are walking on, in a mall you are in, look around you - the ceiling, at the escalators, at people. Patterns are interesting. So the cat picture, has interesting floor tiles, and I've place the cat using the rule of thirds - rather than right smack in the middle of the picture, as one would naturally be inclined to do.
 You'll find patterns and repetition all around you. You just have to look out for it.
4. Look for the Unusual
What I like to do, is to see if I can shoot something in an usual way, or a way you don't normally see. There is a lot of trial and error (just shot, costs you nothing in digital), sometimes it works, often it doesn't - but the more you try, the better chance for you to come out with interesting shots.
 The left picture, is interesting because, it is shot from a different angle/point of view (plus note the rule of thirds?) - which would be very different if I had just shot this from the side.

So you go to a famous landmark? Don't shoot it how everyone would shoot it, or see it. Find a different view point, pay attention to patterns, leading lines, rule of thirds. Learn to see things differently, and your pictures will come out... different! So the Colosseum has probably been shot to death. So I chose to try out shooting it at night, using long exposure.
 Be willing to experiment, and try things. I read a lot, and see what others in the photog world does - and try em out. This future like picture on the left, combines both patterns, leading lines and bit of rule of thirds (the focus of the picture is not right smack in the middle).
5. Learn to Break the Rules
Last but not least, after you know the basic rules of composition, break them! Don't always stick to the rules, different things - the last you want is for all your pictures to look formula-ish/boring.
Wherever I go, I carry my camera (mostly), I keep looking out for interesting things/people to shoot - and I keep shooting!
3 of the oldest "golden rules" are: 1) Rule of Thirds; 2) Leading Lines; 3) Patterns
To this I'd add: 4) Look for the Unusual.
1) Rule of Thirds.

 Here's another illustration. It works especially with portraits, where I always give space where the person is looking at. So the picture on the right looks much better with the empty space on the right in front of the bride, rather than behind the bride on the left.
2. Leading Lines

So if you are taking any landscapes, look out for fences, or other things which would lead the eye to the main object in the picture.
3. Patterns


4. Look for the Unusual
What I like to do, is to see if I can shoot something in an usual way, or a way you don't normally see. There is a lot of trial and error (just shot, costs you nothing in digital), sometimes it works, often it doesn't - but the more you try, the better chance for you to come out with interesting shots.
 The left picture, is interesting because, it is shot from a different angle/point of view (plus note the rule of thirds?) - which would be very different if I had just shot this from the side.
So you go to a famous landmark? Don't shoot it how everyone would shoot it, or see it. Find a different view point, pay attention to patterns, leading lines, rule of thirds. Learn to see things differently, and your pictures will come out... different! So the Colosseum has probably been shot to death. So I chose to try out shooting it at night, using long exposure.

5. Learn to Break the Rules
Last but not least, after you know the basic rules of composition, break them! Don't always stick to the rules, different things - the last you want is for all your pictures to look formula-ish/boring.
Wherever I go, I carry my camera (mostly), I keep looking out for interesting things/people to shoot - and I keep shooting!
Sunday, July 15, 2012
First Portrait Shoot

Here's my first "portrait shoot" for Matt, who wanted a CD cover for the single he's going to release. He used another picture from elsewhere finally, but that's beside the point.
This was a week before my wedding shoot, and again, I had no idea what to expect. I've always shot candid shots. This isn't as challenging as a wedding shoot, but again, it's a whole different kettle of fish.
Anyway, Matt didn't have that much of an idea of what he had in mind. I listened to his song, and thought something contemplative was appropriate, and thought of something clean, simple (I asked him to bring a white shirt, and others, to try). He picked the place (Food for Thought at Botanical Gardens, Singapore), and we met there.
I did realize that people management is probably key - getting someone to relax, to smile naturally in front of the camera, is probably a skill in itself. Matt was game for anything, so we shot in the courtyard, inside the cafe, out in the gardens. I used mainly my 24-70 f2.8 and 80-200 f2.8 to shoot. I took quite a few, just to see where was Matt's "good" angle. I also experimented with my flash, with and without colored gel.
My personal favorite was the above, Matt sat on the inside of the cafe looking out. I shot from the outside, and framed the reflection and light - so as not to obscure his face, and him looking distinctly "contemplative".
Anyway, it was good fun, and good learning experience for me.
Nothing ventured, nothing gained!
Gotta keep shooting :)
Monday, July 9, 2012
1st Wedding Shoot Reflections

A good photographer friend (Bryan Kam) asks if I'd be interested to shoot his wedding - he didn't look like he was joking, nor was he running a fever, so, nothing ventured, nothing gained - and I said yes of course! The only proviso was, I've never shot weddings before, so as long as he had a someone else taking the main event, I'm just a newbie taking, expect nothing and you won't be disappointed!
I can tell you I've never been so stressed in such a long time! Here's a list of learnings from me.
1.Equipment
I decided to try out Bryan's D700 paired with 24-70 (perfect combo!), together with my own D90 (which I used with ultra wide angle Tokina 11-16, switching with telezoom Nikon 80-200).
So the moment I reached Bryan's place in the morning, I spent half hour, going through the D700 settings, of which I think 80-90% are the same/familiar. So we're set!
I had also just started trying to use a flash. So I was experimenting shots with flash and without, and starting to like those with flash.
Bad, bad, bad.
A.Underexposure.
The exposure was all over the place, the screen shot often showed it under exposed at least 1 stop. So I had to keep looking to manually adjust the exposure.
B.Shutter speed
The D700 kept shooting at 1/15, when I shot at Aperture. I had set it to shoot at a min of 1/60, and to bump up ISO instead. It did not. I tried manual exposure, but when I inserted the flash unit, it really messed up the exposure meter. I had NO idea why, and no time to figure out. Just kept at Aperture priority; TTL and hoped for the best!
But not all is bad.
C.Lenses
Well, I can say that the 24-70 fits FX much better than my DX. It felt more natural, and useful range.
I also liked my 11-16 ultra wide angle shots. These were the 2 most used lenses.
I'm not sure I'm brave enough to go primes, although a 85 F1.4 would be nice (in theory).
D.FX Camera
To be honest, I couldn't tell the diff between FX and DX cameras, and even pictures (besides heavier, fast fps). So having that itched scratched for a while, going full frame isn't as much of a lust. But having 36 mega pixels and vast dynamic range is still so so tempting.... :)
E.Auto-focus points
I used to think having more AF points was great! Going from my D90 of 9, to D700 of 51 - gosh, what a jump, but not a good one. I'm used to manually selecting the focus point, and having to zip through so many AF points, is slow and tiring.
So I now know, what I need is not more, just points to cover more of the viewfinder.
F.Flash
Again, thrown into the deep end of flash usage, I realized that I did like the shots with flash better than those without (I shot a lot of shots, both with and without). The DEMB diffuser was great, and experimenting with it, somehow I liked when the diffuser was in front of the flash. The flash gets reflected from all the walls to the subject, so fills the shadows, without the harsh light.
After this, I am now a flash convert. Now to really learn how to use one well.
2.No Room for Error
If you are doing this for a job or paid, there really is none.
For landscape, when I spoilt a shot, I could go back the next day/time to try. But you can't really ask the couple to redo the entire day again! You get one chance, that's it!
3.Changing Light
The day passes really fast. You move indoors, then outdoors, light changes very quickly - there is really little time to think too much, you'd have to just snap - almost on instinct - and hope it all turns out!
4.Having a Checklist
This being my first wedding shoot, I wasn't so sure what to really expect, and what to do. So I really just went along and shot candidly, documenting what goes on, tell the story.
If I ever wanted to do wedding shoots seriously (I don't), I'd definitely have to come out with a checklist, and make sure I cover those. Including scouting out the premises before hand.
There are things which I realize, I could have done, to make it better are some of the more detail shots - cliche as it is- will be nice: picture of the wedding bands, shoes, bride getting ready, groom getting ready.
That said, to be really good, you'll need to move beyond the cliches, develop shots which are different, and having your own style to it.
5.Managing People
Also, a real wedding photog, will also need to know how to manage and pose people. I'm not so comfortable doing that yet, it really is a different kettle of fish. But I'm glad to have watched the pro (Alex) do it.
I'm also very blessed that the bride Kristin Ooi, was fantastic in front of the camera. She always smiled for the camera, and had a gorgeous one too! Interestingly, her dad also "posed" for the camera, when he saw one pointing at him. But he gives this expressionless deep stare, which makes for a great portrait!
6.Fighting for Space
One of the interesting things, was trying to find space. When Bryan was getting his bride, there were 2 videographers, and 2 photographers buzzing around (paparazzi!). So hard to get shots without someone "unnatural" in the shot. It was a lot better when we went to the church, where we could all find our own space.
When I was shooting tea ceremony, I had to jostle for space a little, with the relatives who also wanted to take pictures, in a small space. So I had to be polite, say excuse me, gently nudge my way to where I could shoot.
Side note: I did cringe whenever I heard "we'll let the professional take the picture", when it was just me there! Good thing the wedding couple didn't let the cat out of the bag!
Final Thoughts
It was a nerve wrecking experience - but I must say that I've learnt a lot from it, more so than reading any books/articles, or even buying new equipment unsurprisingly. So thanks to Bryan and Kristin for giving me the opportunity to shoot - they were indeed very brave (and foolish!) to entrust such an important event to a newbie!
And it was nostalgic for me to be back at Prinsep St Presby Church, where I got married 16 years ago.
Marriage is such a wonderful gift from God, I'm so thankful to God for my wife, whom I love more and more as each year passes.
To Bryan and Kristin, have a blessed life ahead. This is only the start - the Best is Yet to Be :)
Monday, June 25, 2012
How I Shot This (2)

So, I was at Telunas Beach in Batam, and shot the above, which I really do like. Since Krystina asked how this was shot, this is 2nd of my picture "tutorial".
1.Timing
The most important thing is light. Best (and only) time to shoot landscapes is around sunrise or sunset. Since I'm not really a morning person, it's mostly sunset. This was shot just after the sun set, known as the "Blue Hour", as you can see why it is called that.
2.Equipment
A) Tripod
You don't need fancy equipment, but you do need a tripod. I never quite understood why, but after I bought it, then used it, I have to agree with many others that it is one of the best "accessories" to get, which will really bring your photography to another level.
B) Camera
I used my only DSLR I have, Nikon D90. Any camera that can shoot manual mode, is fine. I also like to shoot in Raw format, which I think is much better for any post processing.
C) Lens
I used Ultra Wide Angle lens Tokina 11-16mm. It's nice and wide, and very sharp. But I could have easily used my 18-200 for this shot.
3.Camera Settings
A) ISO
I always pick the lowest ISO available, when I want a long shutter exposure. So I picked ISO 100 - the lowest D90 has.
B) Shutter Speed
I didn't have a watch or phone with me, so I decided to stick to max of 30 seconds . Any longer, will be "Bulb" mode. You need a longer shutter speed when you have low light, or night shots. This has 2 effects
- Smooth Waters. Any water bodies becomes like glass.
- Star burst lights. Any light source, becomes star burst. Experiment with different aperture sizes, and see what works.
C) Aperture
So based on the above settings, I had to put aperture at F22, as my manual mode tells me as the right exposure. Some will say that above F16, there's diffraction. I've never seen any (to my naked eyes), so I'm not convinced that F22 is "wrong".
4.Composition
Besides light, the other thing to note is Composition
A) Leading Lines
What is interesting is the bridge leads your eye from the edge of the picture to the main object (huts).
I normally like going from the corners to the middle center-ish, but in this case, slight difference.
B) Rule of Thirds
Most folks will put the subject right smack in the middle. But if you put it a third off the middle (think of a tic tac toe grid, at any of the intersactions), the picture will look much better. So the Main Hut in the picture, is a third off.
5. Shoot!
So camera on tripod, composition sorted out, I used my timer (set to 2 seconds) and pressed the trigger!
The timer negates any camera shake, when you press the trigger. Sometimes I use a wireless trigger, you can also use a cable trigger - but a 2s timer also works fine.
That's it! Isn't so difficult, just keep trying and keep shooting!
Thursday, June 21, 2012
New Toy: Nikon SB700 Flash

I have decided to finally get a flash, to learn how to use one. I was contemplating getting a 3rd party Nissin i866 (more powerful, cheaper), but from a review and comparison of various flashes, the SB700 was recommended over the Nissin, and others.
Got it from Tokocamzone, which was great, coz I ordered it this morning, and 2-3 hours later, courier arrived at the office. Same time as it would take for me to go there and back. And Tokocamzone is the cheapest place in Jakarta to get photo stuff.
So here goes! I'm off to Batam (16th wedding anniversary, with fam and inlaws), batteries fully charged - and the experimenting/learning begins! If any pix comes out good, I'll share :)
Keep learning and shooting!
Wednesday, June 20, 2012
Playing with a D800 file.
In my quest to keep learning, I follow guys like Jared Polin, who has this Fro Knows Photo site, and does lots of photo video tutorials. One of the things he does is Fro's edit of the week, where you download a file, edit it, and upload it. This week, there was a D800 file, which I was interested to see and play with, so I gave it a go.
The file is huge - abt 32MB, or about 3 times bigger than the normal D90 files.
The Original RAW looks like this.

Here's a Cropped Version: Check out how much detail there is.


Here's a Further Crop: Seeing how much crop this image can take, I cropped it more. The detail/clarity is insane!

Add a touch of Lightroom: I can see myself getting used to such big files. And the dynamic range should be quite nice too.

I'm going to see how the D600 turns out (should be out later this year), but I can see myself liking the D800 very much!
Keep Shooting!
The file is huge - abt 32MB, or about 3 times bigger than the normal D90 files.
The Original RAW looks like this.

Here's a Cropped Version: Check out how much detail there is.
Add a little Lightroom: The image below is what I uploaded, using a preset I just found online.
Here's a Further Crop: Seeing how much crop this image can take, I cropped it more. The detail/clarity is insane!

Add a touch of Lightroom: I can see myself getting used to such big files. And the dynamic range should be quite nice too.

I'm going to see how the D600 turns out (should be out later this year), but I can see myself liking the D800 very much!
Keep Shooting!
Tuesday, June 12, 2012
How I Shot This (1)

I was at ARPC church camp @ Hotel Palace of Golden Horses, KL last week. And I walked around a bit, seeing what would be interesting to shoot. I saw the sun setting-ish, and thought it would make an interesting shot, so I shot the scene using my D90 + Tokina 11-16, setting it at 11mm, switched to manual shooting mode with aperture at F8; shutter speed 1/1250 (based on the sky exposure); ISO200 at RAW. I shot 6 shots actually, but only the middle 3 were used, see below.

Just note that this is w/o ANY processing, no in-camera or Lightroom processing, so it looks pretty dull. With Lightroom, I import all my pictures now using the adobe provided "Direct Positive +" preset. Due to the uneven light, I pulled my "highlights" slider to -100; "shadows" to +100; boosted the "clarity" and "contrasts" a little, and this gave me

So it's starting to look a bit better. Now, behind me, there's a "lake" so I couldn't move back. And I wanted all the palm trees in the picture, with a bit of space on the left - which is why I decided to shoot a few (6 in all). When I tried to stitch all 6, it was really warped/distorted, so I experimented with 1 less picture, until I thought the 3 looked best.
I use Microsoft's Image Composite Editor, which is the best free stitching program I've tried, and it gave me this. This is probably what the eye "naturally" sees.

But I wanted to give the clouds a bit more of a dramatic edge, so importing it back into Lightroom, I again pulled the highlights to -100 (to soften the brightness of the sun), shadows to +100 (bring out details in the shadows, else it is too dark); boosted the contrasts and clarity again (just gives more definition to the clouds, but the downside is that the trees look "artificial" with a bit of ugly halo, but it's a bit of a compromise) -it won't be everyone's taste, but I prefer it. There's this HDR quality which I'm not all that fond off on the trees, but I loved the effect on the clouds.
The end product is the picture right in the top!
This is for Bryan Kam, one of my photo mentors who helped me tremendously when I just started out, 1.5 years back, who was curious how I got the shot. So it's a step-by-step tutorial.
I just have to say Lightroom is a really great tool, and can't recommend it enough. It is easy to use, and very powerful (I'm only using the tip of the software's ability, and still lots to learn - thus my post processing isn't all that good, but I'm experimenting and learning).
Keep shooting and learning new stuff to try!
Saturday, June 2, 2012
How to shoot Panorama - with what you have!

You don't really need any fancy equipment. The above shot was taken with my D90 DSLR, with a Tokina 11-16mm lens - handheld. It could have easily been any decent point and shoot or even iphone. For the above, I shot at 16mm, shot with approx 1/3 overlap. Then I use Microsoft Image Composite Editor (best Free photo stitch software I tried), select which pictures (there were 8), and it automatically joins it all together.

Here's another example with just 4 pictures stitched together.

The above is a little more complicated. The first time I did, it didn't turn out so good. So I went back, mounted the camera on a tripod, swiveled it and methodically shot it. 19 pictures altogether. But because the panorama is so wide, any unevenness ends up distorted (the ground wasn't 100% flat, and the horizon wasn't 100% level. I tried the same shot, at 24mm instead of 16mm for the rest, and the distortion was significantly less. But too narrow.

Here's a 16 image pano. Not as much horizontal distortion. But due to physics, the parts closer to you (in the middle), end up more distorted/very close together, sides stretched out. And I should have shot a bit more to the right, and have the whole tree in.
I managed to take about 20 different panoramas, and processed all of them, and here's what I learnt:
1.Timing: sunrise or sunset. Those are the best times to shoot, the light is just gorgeous, not too harsh.You get a nice warm glow.
2.Camera settings: Manual mode completely. No auto mode, so that the exposure is exactly the same, or you'll end up with pictures that are patchy and inconsistent. Else, you end up with different exposures, and patchy pictures after you stitch. Oh, shoot Raw. There's just so much more data available to use later in post production.
3.Expose for the bright areas. The exposure is tricky, in such a wide panorama, do you expose for the sun/brighter areas or darker areas? I chose the brightest area, so that you don't have blown highlights (check also histogram)- you can always bring out details out from dark areas, but once it is lost/blown out, there is no data there to bring out. So I used F16 (bigger number is good, means small aperture and everything is clear), 1/30s shutter speed (what the camera says is right exposure) ISO 100 (lower better, for low noise), manual white balance (I used sunny), and manual focus (use auto to get the right focus, then move it to manual).
4.Tripod is necessary for very wide panos. Optional for those with fewer pictures. For really wide panoramas, you need the tripod (so that you don't have gaps). Or you can try experimenting hand-held. But on a tripod, I make sure that I can capture what I want, from the start to the end.
5.Overlap by at least 1/3. I take the first shot, if it looks ok (exposure, composition), I shot a shot every 15 degrees. You need at least 1/3 overlap between pictures- more better. As per my comments in the 4th picture, I think if you have more pictures, with more overlap especially in the middle/closest to you - you will have less distortion, and a more natural pano.
6.Shoot portrait. Unfortunately, all my shots were shot landscape. And you get gaps, esp at the corners - like my 3rd picture above, the trees got cut off, as it just wasn't tall enough. What I should have done is, shoot portrait, give lots of room around what you want to shoot, then you can crop in later. If you have gaps, then you're stuffed, and the effort is wasted. You'll end up with more pictures, but again, better more/excess than less/shortage.
7.Use a normal lens, not Ultra Wide Angle lens. The UWA (tokina 11-16 f2.8) is a great lens, very sharp. But for panoramas, the distortion is in proportion with the number of pictures to be stitched together. See above pictures, the 4 image has the least image distortion. 8 image has more, and the 19 has just too much. So if you have just a kit lens, that should be fine. You need a small aperture anyway (big F number).
8.Post Production: Check exposure. I use Lightroom, and I look at the brightest picture, and fine tune it. Then I copy the settings to all other pictures to be used in the same pano. For a few, when the light shift too much, I had to manually tweak the light levels (only), so that it looks even across.
9.Post Production: MICE to stitch. Easy, fuss free, and fast. I import into Lightroom again, for a final touch up, but it really isn't necessary.
Voila! A Pano to capture the scene you want.
Keep Shooting!
Monday, May 28, 2012
How to use ND Filters?

I love long exposures, the streak of lights from cars, the star burst from a street side lamp.
It helps you "see" in the dark, a city comes alive after dark - but that's all in the night.
You can also shoot long exposures during the day, giving you a complete different look and feel.
Those waterfalls that have smooth curtain of water? Yes, they use a ND filter, to filter out light so that your shutter speed can stay open longer.
I got a 9 stop ND filter from Hoya (it filters out 2 to the power of 9 times of light, leaving 1/512 % of light coming through), which costs me about S$50. (there are also variable ND filters, that go from 3 stops to 8 or 9; and also 10 stop filters from B+W, but is expensive). Here's how it works.
 On the left, this is a "normal" shot of some kelongs (fishing huts) which I saw at my recent holiday. Camera on tripod, shot at F16; 1/60sec; ISO360 at 170mm.
The picture right on top, is after I've processed it in Lightroom, including a B&W conversion - which I think looks better than the 1st. It works better if the background isn't cluttered, like in my case. You get a better minimalist/surreal kind of picture.
Here are a few more examples of pictures made with ND filter. Note that the ND filter does have a blue color cast, which can be easily corrected in Lightroom, as long as you are shooting RAW.

And one more, of a slightly different use. This is the underground link from The Fullerton to One Marina Boulevard in Singapore. There's a travellator there. I mounted my camera on tripod, put on the ND filter, stepped onto the travellator and shot this at F5.6; 30sec; ISO400. You get this interesting zoom effect, whilst the ground is still clear (as it is moving with you). Added a yellow color cast in post processing, just to make it look more out-of-this world/interesting (to me!).

So, here's a new tool, that isn't too expensive, but fun to learn and try! Keep shooting!
Sunday, May 20, 2012
Bored? Try Light Painting
After reading an article in Digital Camera Magazine (Malaysia Mar12 Edition I think), I decided to give Light Painting a try. I went to hardware store to buy a colored LED light, which ended up way too bright - so I used a normal laser pointer (the one used for presentations).
1.Here's what needed:
a.Tripod
b.Camera (d'uh)
c.Remote Trigger (or set camera on timer)
d.Laser Pointer
e.Really dark room (ideally with black out curtains)
f.Object to "paint"
2.There's a bit of trial and error, but here's what I did
a.ISO to Native ISO (in my case 200. Could be 100 as well, I guess).
b.Aperture to F16
c.Shutter speed set to bulb mode
d.Press the trigger
e.Use laser pointer to draw outline of the object - or what ever effect you want.
f.Press the trigger to end the exposure (in my case was 53 seconds).

Here's the best of a few tries. It's a pair of my son's football boots, put on my marble floor (hence the reflection). Well, it was fun trying something new, so I'm happy to share.
Have fun shooting!
Monday, April 16, 2012
I've been legally Lightroomed!
A friend "passed" me his copy of Lightroom 2, when he got his Lightroom 3, fairly recently, which I've used a lot, and learned to love it! I've mentioned it previously, but this is a longer post.
Here's why I love Lightroom:
1. I have my entire library of photos organized and cataloged.
a.All my pictures are filed according to Country/City/Year/Dates.
b.Most of my pictures have been tagged with keywords, can't say it has been diligently done 100%, but in theory, I could find a picture via keywords, like google search.
c.You can also tag it 3 different ways - color code, # of stars, but I use the simplest, which is to flag it. See more on workflow below.
2.Makes using RAW files a breeze.
a. The problem I had previously with other free RAW processors, is that the JPEGs were always nicer, and better processed. But with Lightroom, processing is decidedly superior, easy to use, and almost anything you need to do, can be done with it - all in 1 software. No more having to switch to different free photo apps to do different things. Lightroom makes handling of files, so easy, except you can't add borders, and do major tweaking (adding or removing elements to the photos), which I don't.
a.With Lighroom, using RAW files, is as easy as JPEG, and still retains all the info (you lose bits when you shoot JPEG). Think Film versus Printed Picture. And you don't need to bother with White Balance - just put on Auto, and you can always tweak it if necessary. I've set LR to automatically convert the Nikon RAW files (NEF) to Adobe's Digital Negative format (DNG), so u just pulls the files, converts, and sorts it into the filing system per 1a above. The advantage of DNG is that the metadata (stuff like keywords) become part of the file, instead of LR having to create a different file for NEF.
3. Simplifies Workflow
a.So after I import in the photos, I do a quick vet, deleting the bad shots, or shots I'd never use. This removes easily... 50% of the shots or more.
b.I go through it again, flagging those I want to post online, and seeing if any of those I want to do some touch ups (whether convert to B&W, boost contrasts etc). I also add in Keywords, if I remember or can be bothered to. *I should be more disciplined..... but.....*
c.With a keyboard shortcut, I export all to a temp folder (same folder I sync my ipad photos with, so that a copy is also available there), then upload. Pretty easy.
4.Love the processing
I just love the B&W processing, boosting the colors of the picture, and I'm still learning. All of my pictures have been processed (some less, some more) through Lightroom. Here's a few examples:


Just take note that, the most important ingredient of a good picture is, composition. This is something you cannot lightroom your way out of. Lightroom is only a tool, to enhance a picture - but you still need to get the basics right, composition, aperture/shutter speed, exposure.
Lightroom 4.
So lightroom 4 was recently launched. The advantages I see over LR 2 are
a. Controls have been simplified. It is marginally easier to use, and theoretically more powerful too! I'll find out more when I use it more.
b. Can import videos as well (LR2 couldn't, and I would accidentally delete the videos, if I forgotten to use explorer to cut and paste into where I want it.). Just saves a step, but a rather important one.
c. Photobooks - it's there. Havn't used it. But I could, if I wanted too!
d. The Price. LR2 and LR3 used to cost US$299, and Adobe has cut the price 50%.
So I finally decided that, since I love Lightroom so much, I should properly own my own copy.
Walking by so many "software" shops here in Jakarta, I confess I felt tempted to pay Rp50,000 or S$7 for a copy! But in the end, I decided to "give to Caesar what is Caesar's", found a copy online and purchased it for abt Rp1.5mn or S$210.
I'm a happy camper! And I encourage anyone, more serious about getting the best pictures out there, to get one (legally) too!
Keep Shooting :)
Subscribe to:
Comments (Atom)